Client Research

This is the first week of Studio 3 where we are looking at commercialisation of video games so that we can better understand how to make money via game development. Throughout the trimester we will be creating an application for a business with a focus on fixing a problem or making a difference in a specific subject. My group is designing an augmented reality mobile game about school gardens, the rest is unclear. Since finding out this snippet of information our group has been researching about AR technology, mobile development, school gardens and existing educational games so that we will have refined and accurate decisions when it comes to the client interview. We have also looked into our client to find out what type of products they create and any methods they like to have consistent throughout their products.

Because we have been tasked with making an AR game about school gardens we can assume the target audience will range from primary school to high school. The polar opposites of this range make for completely different products. For the primary school we could hone in on the game elements and make a game about taking care of a virtual plant they can place in their surroundings. On the other end, for the high school we could make a game that displays the inner workings of a plant and give encyclopedia level information to focus on the education elements.

So while we may be a bit hung up on this one missing piece of information, we have had to make sure that we have sufficient information in all the other areas so that we aren’t left behind after the first interview. Making sure that once we find out who our target audience is, we can follow up with questions exclusive to that audience and make sure that we get the most out of our first client interaction.

We have also been looking at existing AR apps and educational games that can help fill in the gaps with the information we have. Here are some examples of the games/apps we looked at that fit in with what the team had in mind for the project. The first is called Prelimb (Prelimb, 2015) and is an augmented reality game where the user can place 3D plants in their garden so they can better decide what they want in their garden. While it does use AR technology in a productive way, the use of the app is very limited and users may only find themselves using it one time. This function of placing plants in an augmented space is what most of the team members have in mind for the product, but that depends on the audience.

maxresdefault

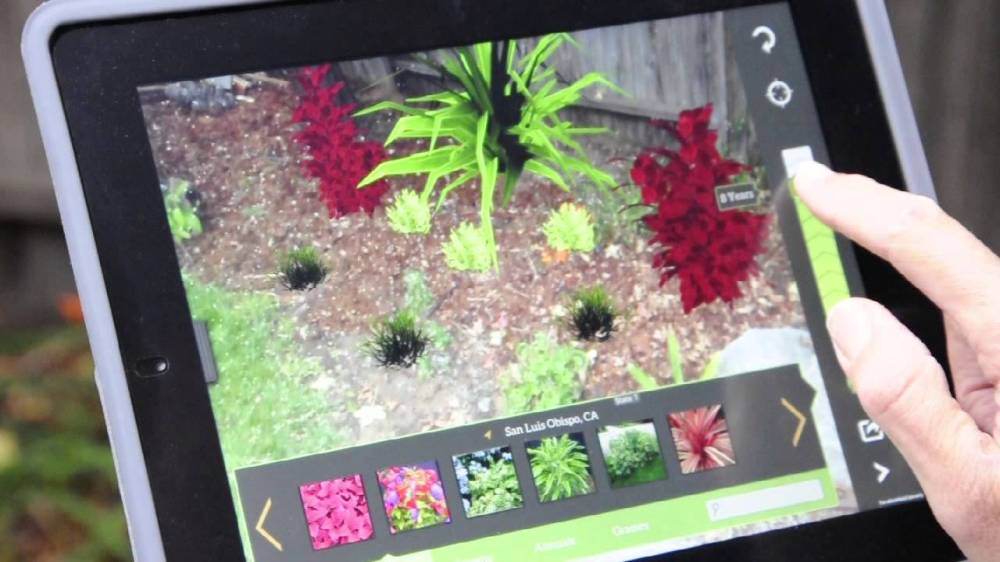
Figure 1. Prelimb (Prelimb, 2015)

The next app is called Anatomy 4D (DAQRI, 2015) which uses an AR tag to display a 3D anatomy model that allows the user to select specific parts and organs of the human body. This app proves a really good strength of augmented reality by emphasising visualisation for education rather than relying too much on text for education. This is very useful to know because we can take full advantage of this strength and make the game more engaging.

anatomy-4d-by-daqri

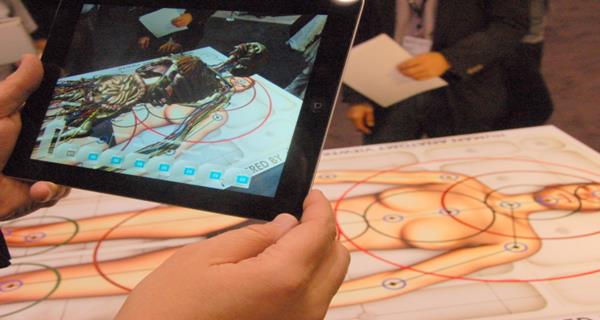
Figure 2. Anatomy 4D (DAQRI, 2015)

An educational game that we found which is called Barefoot World Atlas (Amphio Limited, 2016) and allows the player to observe the earth from a top down view and select landmarks and points of interest around the world which displays information and flavour text about the selected location. This is a really good example of the amount of flavour text and information needed for a primary school student. The game features really satisfying animations and a unique art style. Simply rotating the world around and seeing all the little icons sparks a sense of wonder and encourages the player to look at them without explicitly telling them to. This balance of education elements and interesting visuals is what I’m expecting our client to ask for.

barefoot-world-atlas

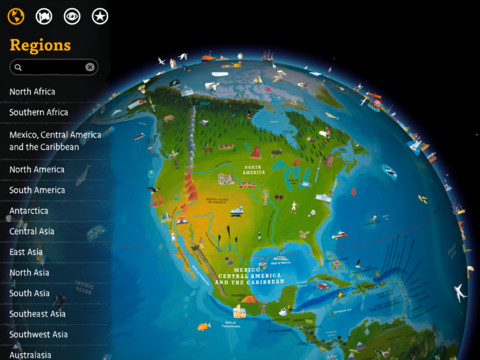
Figure 3. Barefoot World Atlas (Amphio Limited, 2016)

These example games are very different and appeal to different audiences. They also apply existing knowledge and ideas into their own design. Our client company aims to be the early adopters and early majority of the Technology Adoption Life Cycle (Rogers, 1962) and because of this we can be sure that our client will want a product that applies existing early concepts into a unique design and not have to worry about reinventing the wheel.

Bibliography

Prelimb. (2015). Prelimb. Retrieved from http://prelimb.com/

DAQRI. (2015). Anatomy 4D. Retrieved from http://anatomy4d.daqri.com/

Amphio Limited. (2016). Barefoot World Atlas. Retrieved from  http://barefootworldatlas.com/

Rogers, E. (1962). Technology Adoption Life Cycle. Retrieved from https://en.wikipedia.org/wiki/Technology_adoption_life_cycle

Our First Client Meeting

Last lesson we had our initial client meeting for our augmented reality (AR) school garden project and we were able to get a solid idea of what the client wants and why. Going into the meeting we only had the information “AR school garden game” which was really vague and made it difficult for us to research the required information. I made a blog covering this research that you can find here. For this meeting our team would be the interviewers, because of that we made our best effort to dress well and make our environment perfect for the client. For future reference we recorded the entire interview on a smart phone and we all took notes.

Most of our questions were answered on the uncorrupted version question which for us was “What exactly would you like us to make?”. Our client obviously had planned out what he was going to say and how he would explain it to us. Because of this we needed to put our previous research to work and make sure we could come up with valuable questions. Because our team is behind due to the meeting schedule, we didn’t want to get left behind in terms of information. If we had gone in and only asked the questions that we had at the time, we would have missed out on about 50% of the information we actually got.

We have found from this meeting that the application will be a serious game made for students between the grades of kindergarten and grade 12. The game will have a primary focus on education by using different learning techniques such as education theory. Because we have such a large age bracket to work with, and the games design can vary a lot given this range, we will need to come up with a method to either target the entire audience with different age brackets or just focus on a single age group. This project has the potential to be apart of students curriculum which is actually a bit nerve racking given the stakes.

For the AR part of the meeting we found that the purpose of using AR technology was to utilize the AR tag functionality which allows the users to scan tags that can call different actions in the app. In this games case the tags can prompt a particular minigame with respect to its location (eg. a minigame about saving water could be found at a tap). As for using the augmented reality and tracking space in order to place objects and such, he was pretty vague about it and it doesn’t seem to be his main focus. Mainly because there are constraints that limit its usability such as when it is raining or no access to some tags.

Because the game is aimed at children we are looking to make a more lighthearted and child friendly art style but also focusing on the realism of gardening practice. There will be a protagonist character that will be the players main source of guidance and information. We were informed by our client that children like to look up to older characters because that’s what they aim to be, because of this we are making the protagonist about 2 – 3 years older than the user.

Some of the topics to research after gathering all this information is pretty diverse. It is important to us to research these points because it will ensure our game is ethical and accurate with its information. Firstly our game will be part of a school curriculum and because of this their progress and data needs to be tracked for the teachers to grade them. We need to make sure that it is legal to track the information we need because it could be a big no-no. We have already been researching AR technology, but our client could have his vision of the app work with just QR codes. To ensure that the client can get the most out of AR technology and make the game more engaging for the children, we need to research further into AR to find out ways we can use it effectively for our design. Again with mobile development, we have already been looking into it but there are so many methods and opportunities for the mobile platform that could help us a lot.

Our client mentioned to us some new terms; design justification and design validation. On the surface it was easy enough to understand but just in case I think it’s worthwhile to follow up on this and make sure we understand exactly what he means by it. Another issue is that these AR tags will be spread out around a school campus and will need to have a lot of thought into how the pathing will work. We don’t have access to the particular school we will be testing this on, so for now getting some sample school site maps and creating a test path for our game is a good start.

The plan from here is primarily research and brainstorming. We already have some ideas floating around but we need to keep throwing ideas into the blender before we can get a clear vision that the team agrees on that we can then pitch to the client.

Field Research

This is our third week of Studio 3 and we are researching topics that can help our design process and also brainstorming ideas for our project. We did some field research at a community garden just across the road from our university campus. This garden hosts a working bee multiple times a week where the community can come in to get their hands dirty and learn about gardening. Going into this working bee I wanted to learn about the overall experience and how we could translate that into our app.

We ended up digging a trench around the inside of a greenhouse to put up chicken wire to keep out pests. When nearing completion we found that it may not be the best solution for the problem because rats and still chew threw or climb over. The organisers for the working bee came up with the solution to use chilli spray to keep the pests out.

This sort of creative thinking made me realise how broad and flexible gardening can be. We were thinking of processes and systems that practitioners use that we could teach students, but practitioners use creative problem solving to ensure they have a solution for every environment and problem. Of course there are still processes that can make their work easier, but they still need to be flexible enough to be applied to many different situations. In order to make an educational app for gardening, we would need to teach everything about biology, chemistry, horticulture, agriculture, etc. But obviously we don’t have those qualifications or time so we needed a compromise.

Our client said that he wanted us to focus on recall activities through mini games, so we can assume that he doesn’t expect us to pack this much information in this app. We can also assume that these students will be learning these things in class and this app needs to ensure this information is recalled when needed through mini games. This is something we need to brainstorm on as a team since it could change our game drastically.

Overall I think this was a really productive use of our time, we were able to get a taste of the overall experience as well as smaller details that we hadn’t even considered before hand. We didn’t get to do the most varied of tasks so we do plan on going again to get a more diverse range of tasks.

After our field research we did some storyboards to get an idea of what our app might look like and how it would function. For the most part we all have similar ideas but we still needed to iterate on them so that we could take them from 50 odd sticky notes and put them on our documentation. Next week we hope to return to the working bee to get some more experience and also iterate on our storyboards and other documentation before then.

Follow Up Client Meeting

This is our fourth week of studio 3 and we have had some major changes made to our design. It has been really important for us to get these design issues out of the way so that we can go forward with the prototype next week. Some of the things we did include;

  • Made a storyboard for our documentation
  • Did some more field research at the community garden
  • Had our follow up client meeting

After going through our documentation and rough storyboards as a team, we made a more official storyboard in our documentation so we could get an idea of how each window would link to each other. For this I decided to use Google’s drawing feature so that we all had access to edit the drawings. Because our storyboard was still in its rough stage, it was important that we all had input to these drawings instead of a single person calling the shots.

As I mentioned in my last blog, we made plans to revisit the community gardens to get a more diverse range of tasks. This time we learned even more interesting facts about gardening and just how broad the topic is. As an example I was tasked with hanging up pine cones from the undercover area roof which serves as a habitat for ladybugs which help keep insects away from their crops. Other than just moving scrap and hay bails around, we spent most of the time removing some overgrown vines around a water tank.

Again this was a really productive use of our time and we also got to do some more diverse activities which even furthered our knowledge. Both of our field research times we spent most of the time doing a single in depth task. This is good because we learn a lot about these particular topics, but we don’t have the time to go in this much detail with each activity in our app. So next week we hope to get even more diverse tasks so we can get a taste of each area in gardening.

Last of all we had our follow up meeting with our client where we could show him our storyboard and fill him in on what we had done over the past 2 weeks. We did manage to get our vision across for the most part, but I feel that we didn’t really get across all of the work we had done. Overall it was a really good meeting and we got more info from him that we didn’t know about last meeting. We had assumed that we would be making the app from the ground up, but this time we found out that we were only designing a small section of a larger project which his team was making.

Our app will serve as a recall app that will help with memory retention similar to the apps memrise and duolingo. Even though we knew this before hand, we did not think to look into these similar mobile apps and learn from their educational format. Because of this we have had to make major changes to our overall storyboard and design. Though it hasn’t made our work up until now a waste, most of it is still relevant in this format.

Personally I have only used memrise in the past and have seen how they handle memory retention. Both of these example apps are for learning different languages, the way they teach is by showing the player the connections between the users native language and the new language they are learning. After this they will then quiz you on the same words and see how well you go. After this the app will have reminders of when the user should review the quizzes to make sure the knowledge is solidified. This below image shows that this user is due for review on this particular quiz, he has the choice to review the words or ignore them.

memrise-ignore-items

memrise review (recall) feature

This is what our app will also do but instead of us teaching the students about biology, chemistry, horticulture, etc, we can assume that the students will be learning about these things in class (or on the main game made by the main team) and then our app will serve as recall through mini games and quizzes.

Moving forward we are again looking to do more field research at the community garden to get as much exposure to the practice as we can. We are also going to be updating all of our documentation as per our client meeting and also looking towards an updated storyboard. As per our milestones, we must have a prototype ready by the end of next week so we have a lot to do.

The Garden Thing Prototype

Week 5 has just passed for Studio 3 where our team got to work setting up a prototype for our game. We are at a point in the project where our documentation is being finalized and we are getting the programmers involved so they can start creating the necessary systems. Next week we will be showing our prototypes to our assigned programmers to get them up to speed with our project. So it’s up to us to make sure our prototype reflects our documentation as best we can.

Our prototype is very basic and we for the most part, used our storyboards as our main point of reference. Because our game is exclusively user interface without any 3D elements, it was really basic for us to create the windows in separate scenes which allowed the team to work in parallel.

Personally I worked on the virtual garden screen where the user can maintain an expand their own little garden. The user can plant a seed on an available plot and water the seed to make sure it doesn’t die. When the seeds growth hits 100% the plant will sprout meaning that it is matured. At the moment this is a really basic functionality and doesn’t reflect the end product. Here is a gif of some of the functions included in this window. The cursor and ‘more info’ pages are sideways because I had to make this garden in landscape whereas the app will be primarily portrait.

virtgard

Virtual Garden window of our prototype

The main issue was connecting everything together afterwards, with all of our different methods of scripting and using the Unity editor. It wasn’t a major hassle but it did result in us spending more time than needed on it. Another challenge we came across while setting us the prototype is the lack of ‘systems’ that we do not have access to. Our client has mentioned that our app is only a section of a larger app and there will be a lot of information and connections stemming from the main app.

Due to this we have a lot of empty gaps in our design and prototype that we need to sort out in our next client meeting. For now we have compromised by use static images or placeholder assets until we know for sure what we are meant to use in the final product.

As I mentioned, for next week we will be showing our new prototypes to our assigned programmers to get them up to speed. We will also have to start looking at our technical design documentation so that we can get the programmers working as soon as possible. There are still some things in the design that need to be ironed out before we start getting into the technical sides of things, but the team is very pleased with the current state of the project.

We will also be attending the same working bee from the previous weeks but on a different day due to a change in time table for the team. We hope to further our knowledge of gardening and get as much exposure to the experience as possible so that we can inform our game design.

Garden Project Management

Introduction

As project manager for this AR project I have had the responsibility of setting out a project plan and determining milestones over the course of 12 weeks. This is my first time taking on the role since I was never really focused on the management side of projects in previous projects.

Methodology

Ever since starting studio work, most teams usually gravitate towards the scrum methodology due to its agile nature and ease of undertaking pivot and iteration. This was definitely the case for this project because we were going in mostly blind without much experience in working in both mobile development and educational games. This meant that we were more flexible in terms of how we could adapt to changes and unforeseen blockers.

For the sake of simplicity we decided to have weekly sprints so they line up with our class times. It would be counter-productive to use any other sprint time frames given our situation. This allowed us to form both our milestones and out of class activities around the general weekly time frames that we were already accustomed to.

Milestones

For our milestones we had a basic overview of what the layout of the trimester would be, but it was up to us to expand on that and form it around our particular projects. As mentioned above, we are using weekly sprints and as such we are having a milestone at each of these sprints. Our milestone list is as follows;

  • Milestone 1: Research potential stakeholders and existing similar games
    • Due to our inexperience with the type of game we were making, it was important for us to look to similar games for influence
    • It was also important for us to research the potential stakeholders we had been given to see what types of products they make and their methods
  • Milestone 2: Initial meeting with stakeholder and initial design
    • This was our first interaction with our given client where we would get the first idea of what we are making
    • Throughout the rest of the milestone we would be looking at project management, research similar games to what we had learnt about the clients request and also start brainstorming different ideas
  • Milestone 3: Follow-up with Stakeholder
    • This was our second interaction with our client where we could show them what we came up with to get some feedback
    • This milestone was almost entirely focused on iterating our design and trying to justify our design through research
  • Milestone 4: First-Pass Design & Development
    • By the end of this milestone we needed to have completed design documentation that would act as the first version of our design that we could use for our prototype
  • Milestone 5: Unity prototype ready
    • This milestone was entirely focused on getting a prototype using our current design so that we could show our given programmers what we were looking to create
    • This also included some changes towards the documentation to reflect issues find during the development of the prototype
  • Milestone 6: Programmers on-board
    • After getting our assigned programmers and showing them our prototype the next step was iterating on our design and documentation to reflect any questions or concerns that our programmers had
  • Milestone 7: Alpha Ready
    • This milestone was mainly spent iterating on documentation while the programmers were making our functional alpha build
    • We also started setting up art bible and asset list documentation with the intent to get some asset creators on board
  • Milestone 8: Alpha Testing & Iteration
    • We spent this week looking at the alpha and giving feedback on the alpha and making sure that our documentation reflects those requirements
    • We also pitched to the animators so we could get some art assets
  • Milestone 9: Beta Ready
    • After the iteration this milestone focused on getting the project feature and content complete for the beta version
    • We also looked further into the asset list due to some unforeseen content during the beta development
  • Milestone 10: Beta Testing and Polish
    • After getting the beta version, we got some outside testing and mostly internal testing so we could get feedback and make any additional changes to the documentation
    • This week was mostly spent on prettying up the game with our art assets, positioning UI and making sure the overall user experience was decent
  • Milestone 11: Release Version Ready & UX Refinements
    • At this point the game should be mostly complete and the documentation finalised
    • Any changes should be very minor and only to polish the user experience
  • Milestone 12: Final Delivery
    • Final product hand over and contract agreements

Momentum

How did we maintain momentum? I have found in previous projects that getting that initial momentum is key to setting a rapport in a team and getting all of the members engaged. But the issue following is that members can easily lose that initial momentum if steps are not taken to maintain consistency. Our approach to this problem was using tools and setting a fixed period during the week that we would have a team meeting. Hack’n’Plan is the most accessible tool that we are all familiar with and serves as an all round project management tool that allowed us to allocate and track tasks as well as our milestones. We agreed on getting to campus 3 hours before class on every Thursday where we could have a discussion about any pressing matters or work in a team environment because we are usually more productive that way.

Tools & Processes

Throughout this project we have been using certain tools and processes to make the project easier for us. This includes the programs we used to make the game, manage source control and the frameworks created by our programmers to make designing the game less tedious.

Game Engine

First off I wanna talk about Unity. So Unity has been our go-to game engine throughout the course, so naturally we would use it since it’s what we all know. But there is so much about Unity that we still don’t know and that was really evident with this project. I personally had never worked with 2D or mobile development and that made this project a learning curve at the beginning. This lead to the project being mostly made through UI and menu navigation rather than 3D space which is what I am accustomed to.

A lot of the earlier Unity work was in the prototype made by just us designers in the team and I gotta say it was a lot of fun. Messing around with a build that would never see the light of day after it was finished is a massive relief and allowed us to get creative with our designer code. I was really proud of what we managed to pull off in the end, you can check out my other blog post about this prototype. The later Unity work was more so based around the alpha and beta builds the programmers made for us. Once the functionality was there, it was up to us designers to setup the mini game levels and polish the menu UI to fit with the visual style. The mini games themselves were really enjoyable to make, after learning the mini game framework the programmers made for us (more on that later) I felt at home with creating the quirky features of the mini game I was tasked with. The menu UI on the other hand was the biggest challenge for me but it served as an opportunity to learn about Unity’s UI features. Features such as UI panels, vertical layout groups and synchronized scene loading which I had only slight experience in, and other features such as buttons and sliders which I had used a lot but was able to get even more creative with.

Source Control

For source control we all use Source Tree (or GitKraken in some cases) which is what we have been using since the beginning of this course. Source control was kind of the elephant in the room in earlier trimesters, where people who didn’t fully understand it didn’t really speak up because of the difficulty involved in learning it. But because of its importance everyone naturally is required to learn it at some point. Because we are already in our third studio class, it’s nice to have a team that can successfully use source tree and also make full use of its features. Using source tree has become a habit for me in all of the projects I am involved in, especially solo projects! I think that the general workflow of allocating tasks and communicating our commits with source control in mind has minimized the risk of merge conflicts and issues with the repository. Because of this I am much more confident working with GitHub and Source Tree when working on group projects.

GardenProjectCommit

Custom Editor Tool

Given the structure of our project and how it utilizes mini games that have similar functionalities, we decided to get the programmers to make a mini game framework. This framework script would be applied to each interactable object in the mini game which allowed to it do various things. This allowed us to script each level ourselves but not have to worry about making separate interaction scripts for all of the interactable objects. Interactions such as tapping, dragging and holding which were present in some form in each of the mini games were made to be easy to implement with the given framework.

Testing Processes

Early on in the project we did not have a plan for testing, nor did we have mobile builds prepared for testing. Fortunately for us designers, when the programmers came on board they ripped our prototype to shreds in terms of questioning the ambiguity and decisions behind our design. It sounds harsh but I don’t think our project could have gotten this far without it. This helped us get a footing for future testing and gave us an idea of the type of feedback we would need to look for in the future.

Testing Plan

The testing plan we had in place for this project early on was mainly targeted towards our client. During the initial meetings with the client, the goal was to get an external tester to be able to access every area of the game without confusion. Of course early on this was not very easily achieved but that was to be expected. We decided to branch out and test outside of uni because we needed some unbiased feedback from non-game devs who will focus on the user experience rather than the technical aspects. I do not have accessible testers in the games target audience age group which is between kindergarten and grade 12, but that was fine because feedback from adults and elderly was just as constructive. I also did not have access to an android device that I could put a build on to test outside of uni, because of this most of my external testing was done through a PC build.

As mentioned above, the earlier tests were focused on getting the user through all of the menus and scenes included in the game. From there we tried to make sure that each area was sufficiently accessible so that navigation was more fluid. We wanted users to be able to navigate the menus without necessarily thinking about it too much. After getting our mini game framework and creating some test levels, the focus in testing turned more towards these mini games because they were the core of the game play. With both the navigation and the level testing, one of the standouts was the mobile platform. We found that positioning of UI elements and the interaction in the mini games wasn’t quite what we were going for. Since we were not testing enough internally on mobile platform we decided to make a change to our approach to testing.

Moving forward we made sure that we always had mobile builds ready earlier than usual and made sure to thoroughly test them internally before getting the client to test them. It’s always a good practice make sure that problems we can find through internal testing are not present in external testing so we can get the most out of our testers time. This work flow of having earlier goals set so we could get builds ready a few hours before our client meeting and then continuously testing them and iterating on them until the meeting came around is what we ended up sticking with. Of course our testing processes were continuously evolving over the trimester and it could have gotten even better, but the workflow we were able to achieve in the 2 last client meetings were ideal given the type of game we were making.

Iteration

Based on the feedback we received throughout testing our various builds, we managed to learn a lot about not only our game, but also our processes when it came to designing. We found that a lot of testing feedback could have easily been gathered through more research into similar types of games on a broader scale rather than nailing doing to 1 or 2 specific games. The lack of direction in the project early on definitely showed in the latter half of the project and made it difficult to iterate on our design. This had a negative impact on the testing process because a lot of our issues could have been resolved without the need for external testers and we could have gotten a lot more out of it.

Based on our testing on the mobile devices we found that a large issue was with the sizing and position of UI elements. Because we were neglecting to test on mobile early in the project, we did not foresee the issue that the UI was way too small on mobile devices. We had a lot of real estate on the device screens but were only using a fraction of it. Expanding on the UI sizes allowed us to get a bit more creative with the UI positioning as well, since there was a lot of layering involved with the main menu.

Some user experience issues we found, is that we needed to make sure the menus have context since the target audience was school children. We made sure that we have some hints setup for each of the main screens and that we tutorialised the mini games.

All in all I think the feedback we got from testing both external and internal was really helpful. After looking back at our processes it makes me realise how important it really is to get people to test the game. The whole concept of justifying your design through research and validating it through testing is much more clear to me. We made an effort to ensure we applied this because we were very aware of the concept, we just weren’t aware of the importance at the time.

Business in the Games Industry

During class we touched on the business side of things by having a look back at the business model canvas that was introduced to us last year. This trimester is focused on the commercial side of game development and it is important for us to understand how a business model works and how we can go about creating one ourselves.

This lesson was mostly focused towards prompting awareness in those of us that aren’t really familiar with this side of the industry. I for one did not really know anything about the requirements for running a successful business in the industry because I did not plan to be an entrepreneur or take a management role in a studio. After getting a taste of this type of work this trimester and seeing how much more viable it is to do contract work, it’s clear to me that this is really necessary for any game dev to know.

Business Model Canvas

So what is a business model canvas? It is a more simplified business model that was invented by the business theorist Alexander Osterwalder. The business model canvas fits on a single page and is structured in such a way that it can help visualise the important areas of a business for both large scale business and entrepreneurs alike.

the-business-model-canvas.jpg

Business Model Canvas

The main goal of a business model canvas is to link together the different areas of a business model. This includes;

  • The customer(s)
  • The products value propositions
  • The channels in which you reach the customer(s)
  • The relationship with the customer(s)
  • The revenue stream
  • The key resources for the value propositions
  • The key activities for the value propositions
  • The key partners which the project relies on
  • The cost structure

The points here follow the order in which the canvas should be filled in because of how they depend on each other. Each section ties into their previous sections in some way which helps simplify the concept of business models. Being aware of the costs, risks and parties involved is important when dealing with customers because you want to make sure your team is reliable and can gain the funding required to produce your product.

The canvas is most helpful for us as game developers by allowing us to create a business plan that can be pitched to investors and potential customers so that they have a clear idea of what they will be getting into. This gives a higher chance of getting contract work which is definitely the most viable way to make money as a game developer.

Here is a crash course for how a business model canvas works from the company co-founded by Alexander Osterwalder:


G A M E F E E L

During studio 3, we are required to show skill in a specific area of game design, I personally chose game “feel” as my specialisation. This area of games is somewhat untalked about and overlooked by developers because of the ambiguity  involved. So what exactly is ‘game feel’ (or otherwise known as ‘juice’ or ‘kinaesthetics’)?

Swink (2008) states that there are 3 main building blocks for defining game feel; Real-Time Control, Simulated Space and Polish. Real-Time Control is the interactivity between the player and the computer and focuses on the processing and expression of information. Expressing information usually prompts the expectation of receiving information, which is received via the senses. It is this focus on the user/players senses that can help give the designer awareness of what the player needs to know in order to feel in control. Simulated Space is the space in which the interactivity exists and how the player perceives the game world. Interactions in the game need to be perceived by the player in some form, and because games are actively perceived due to the need of expressing and processing information, this is key to how the game feels. Polish refers to the additional effects that enhance interaction without affecting the simulation. As an example, an explosion in the game can just be a circular collider that damages any character that touches it, a polish effect could be to add a sprite animation to communicate to the player that an explosion happened. This does not affect how the game functions but it does communicate to the player what is happening in the game world.

This can be hard to grasp at first, and mainly because a lot of this stuff is simply assumed by us. When we make a game we naturally try and add details to make it seem more realistic and unique. You can have multiple games that are functionally identical, but by applying different polish effects you can achieve completely different sensations.

Demonstration

I have made a small game to demonstrate how small details and polish can change how the game feels. This game has the basic functionality of movement with a goal of getting to the end of the level. I have made the additional elements able to be turned on and off during play so that it is easy to see the difference. I will refer to the ‘game feel’ elements as ‘juice’ throughout to avoid any confusion. Here is a gif of the game in it’s functional state, it is very bare bones and is intentionally basic to try and emphasise the effect of the juice.

juice1

Functional and square shaped

Movement

First I want to talk about the movement. In this demo I have made it so that the playable object has physics applied to it through the use of a rigidbody, but I wanted to convey the idea that the juice mode has physics and the the basic mode does not. The basic movement feel of the object is really static because it instantly accelerates to maximum speed and decelerates to idle almost instantly also. The basic object can instantly corner making for more jagged turning whereas as the juiced movement has more curvy and smoother lines of travel.

The collision of the object also plays into how the game feels. With the basic collision, there is no feedback both in how the object rotates or moves. The juiced mode has rotation when colliding and slight bouncing around, not to mention the various collision events that I will get to later.

juice2

Physics!

Camera

The camera is another large aspect to how the controls feel and is relatively simple for the type of demo I’ve made here. Because the focus is only on movement and avoiding collision, all I would need to do is move the camera towards where the player is moving so they can see what’s ahead. Even though the camera view size is large enough to see any threatening obstacles, giving the player a leading view will help make them feel in control and give feedback on what direction they are moving in. To further emphasise the smoothness of the objects movement we can also apply a linear interpolation to the camera.

juice3.gif

Camera Lerp and Camera Lead

Now we can talk about the hot topic of game feel, camera/screen shake. So there’s no denying that camera shake can help to emphasise the impact of certain actions and is a very simple but effective way of giving feedback to the player. Seeing as my demo here is all about collisions, it’s a no-brainer to add it in. To make the camera shake feel more realistic, I have opted to change the intensity and duration depending on the collision speed of the player. It’s a very minor detail but it can definitely sell the effect more so when the collisions feel like they have variance.

juice4.gif

C A M E R A   S H A K E

Visual Effects

There isn’t much happening when actually colliding with the environment, a lot of the feel here is relying on physics and the camera. We need to add more visual feedback that the player is actually interacting with the game. One of the most effective ways to do this is to add particle effects and other small visual details. I have 3 details I added into this demo to show off visual effects, they are very basic but they do emphasise the impact of the interactions. First off I’ll take about the environment visual effect. I made it so that when you hit the walls, all of the walls in the level will flash red. This is similar to how some games make enemies flash a colour when taking damage.

juice5.gif

Environment flash

I have 2 different particle effects in the game, one on collision and another as a trail for the player. The collision effect serves as feedback for collision and also is intended to communicate the intensity of the collision much like the screen shake. As you can see with the below image, the velocity of the collision determines the size of the particles. It goes hand in hand with the screen shake and helps keep the feedback consistent. Another good point here is that the particles spawn at the collision point and not at the center of the player object.

juice6.gif

Moon runes

With the trail effect, it helps to communicate to the player the speed at which they are travelling because it emits more particles the faster you travel. It also helps to communicate the players line of travel which goes hand in hand with the smooth physics based movements. With this particular demo, it’s difficult to get a point of reference of the players position because the players distance from the walls. This trail effect is simulated in world space so it serves as a good reference point for the player relative to world space.


juice7.gif

Trail Effect

Audio

I got my audio from the reliable and always trusty BFXR site which procedurally generates sound effects which can also be fine tuned. I just have 2 sounds, one for the character movement and one for the collision. The movement sound oscillates and will change in pitch and volume depending on the speed of movement. It serves as another reference point for the player’s speed. The collision effect is a crunching sound that is fitting for a crash and communicates that what they did is bad. It is intentionally jarring to go hand in hand with the screen shake, particle effect and the environment flashing.

Here’s is a video showing off the audio. Since all of the changes have been added, this video will also serve as the final demonstration and will compare the initial version versus the complete demo.

Bibliography

Swink, S. (2008). Game Feel: A Game Designer’s Guide to Virtual Sensation (pp. 2-6). Hoboken: CRC Press.