Scooch Post Mortem

Introduction:

For project 3 of studio 1 were put into teams of 4 – 6 members and given a brief to make a game with “no complex bipeds”. Our team consisting of 2 designers and 2 programmers decided to go with a drifting / parking game that we later titled “Scooch”. This project had its ups and downs, but overall I think it was a good learning experience for me and my team.

What Went Wrong?

1. Lack of roles within the team.

The roles within the team were extremely vague from the beginning with the only roles designated being project manager and vision holder. This forced us to be flexible and really push ourselves to be competent in all fields. It’s definitely a good learning experience but was not the most efficient way to get things done. I had a constant feeling of “What do I do now?” because I spent most of my time out of meetings and class doing the documentation when I think I could have been contributing more towards the creation of the game since that’s what I enjoy most in development.

Recommendation: Figure out team strengths and weaknesses at the beginning of the project and assign roles accordingly. Even when in such a small team, it’s easy to get lost in the void of “I don’t know what to do”. Having a role gives you a heading and will ultimately help in the long run.

2. Lack of project management.

This one ties in with the first issue, having a lack of roles within the team, and also having a lack of project management left us in an awkward state. One of our members was extremely motivated about this project that despite not having project management, they continued to work through. This left the rest of us kind of in the dark, we couldn’t allocate tasks to everyone or get a proper understanding of how the early builds of the game worked because one person was soloing the project and had not made the source files publicly accessible yet. The majority of our contribution to the project was attending meetings, brainstorming and helping create the game in an over the shoulder way. We still had an impact on the game, but it wasn’t a team effort.

Recommendation: Have a frequently updated project management method, such as Hack n Plan or Trello. Always check in with team mates to make sure that everyone has tasks and is happy with the current state of the project.

What Went Right?

1. A clear vision.

Since day 1, heck since 30 minutes after we were told the brief, we had a solid concept in our minds that we ended up sticking with. It was simple enough and had enough potential that we could all understand it straight away. We were all really keen and were willing to understand each others ideas for the project. Because our games pivoting and changes never interfered with this original concept, we were all able to keep up with the state of the game.

2. Skilled team.

Our team was filled with competent members and we really showed that in the first few weeks. We all had skills in different areas and were able to push the project to be the best it could be. There were a few hurdles later down the track but we were able to stick it out and produce a solid piece of media.

3. Motivation & Participation.

Since the first concept, we were all hooked on making this the best game we had ever made. Compared to previous projects, I had never felt so involved in an activity. We would all show up to meetings multiple times a week and we all had a perfect understanding of how the game functioned. When something was required from someone, they would get it done without issue, or ask for help otherwise.

Conclusion:

I learnt a lot in this project, both in the good and bad. It’s really given my confidence in my abilities and makes me want to work in a team a bit more than previously. My main issue with this project is that people that do not have much experience in teams, tend to work better solo. But at the same time if you learn to work in a team, then you can produce much better results, tenfold even. And so while one person was smashing out a quality game, we weren’t learning anything. I think that studio 1 is meant to be teaching us team work and to keep everything under control, and we just weren’t getting what we could have out of that period of time.
Pitching Scooch to Potential Collaborators

For the third project, we were given the opportunity to attract collaborators to work with us on our game. We pitched out project twice, once to our fellow class members and the second time to the potential collaborators. Because of this we were able to get some meaningful feedback before attempting to attract the external talent.

The methods that our team used to get the collaborators included putting the mechanics of the game at the end. Because the animators and audio students care about how their work will impact the game and the sort of work it will involve, we figured that leaving the game jargon until last will catch their interested more effectively.

With that said, another method we used was to reduce the amount of game jargon used in the pitch. Because of the first pitch we were able to refine our mechanics explanation down so that we didn’t confuse the audience in the second pitch. I think that I explained the game mechanics in a simple and concise way which got some of the collaborators interested.

After the pitch we had setup in the room next door and had quite a few animators come to checkup on the project with the interest of collaborating on Scooch. We ended up gathering five animators to collaborate on our project which we considered a success. The problem from there was figuring out what work we could get them to do.

What would I have changed?

I think that we were successful in gaining a lot of collaborators, the main problem being that they were all animation students. It was great that we were able to attract so many people but having 5 animators was not necessary, especially since our game consisted of mostly static objects. The main task for animators was to make 3D models, another issue with that being that one of our members is very skilled in 3D modelling. I had hoped that we would gather some audio students but unfortunately due to a mishap in the pitch we didn’t explain the audio of the game as clearly as we intended.

In the future I think its important to cater to all possible collaborators, it was definitely our intention to do so and we were able to pick up some audio students later down the line through networking. Explaining the importance of the assets needed for each field would be a good way to attract collaborators from other disciplines. We hadn’t explained how important it was for us to have audio in the game, and we had some really good ideas in mind for audio but didn’t end up implementing due to not enough audio collaborators.

Project 2 & 3 Pivot

In both project 2 and 3 there was a lot of feedback that ended up changing major parts of the games. Most of the time it wasn’t stuff that we had thought of at all, and sometimes they were risks we take for play testing to see what people think.

Project 2

In project 2 our second iteration of the game included a very complex system for maths and card dynamics. The cards explanation was confusing to the play testers because they could not figure out what card was being affected by the card effects, and they couldn’t figure out when card effects are applicable or not. The play testers main feedback was that the rules and card effects were too vague and left them to guess, and because of the complexity of the game, they aren’t sure what to assume. Because of this we opted to add a target system and a effect type system. The target system makes it so that on a card there will be the cards target displayed and then the cards effect underneath it. Eg.

Previously: Choose a Blame card and add 10 score.
After Update: Target: Blame card of choice. Effect: Add 10 Score

The effect type system helped players know when a cards effect should be applied or not. The two effect types were Trigger and Persistent, trigger meaning that the cards effect is applied when it is played and never again. Persistent means that the effect stays in effect while the card is on the field. These new systems were good for people who knew about card games and were interested enough in games to focus. But that became the new problem…

The game had so many things to remember and the cards were cluttered with jargon, the feedback we were getting from external play testers was telling us to simplify our changes that were meant to simplify the game. Our solution to this was a redesign in cards, thankfully the designers that were working on the cards had designed them to hold a lot of text. Originally I had tried to keep it minimal but I found out that, that was my downfall. Now that there is a paragraph on each card, the effects and targets can be explained in sentence rather than using jargon modifiers that the player doesn’t care to learn about.

Project 3

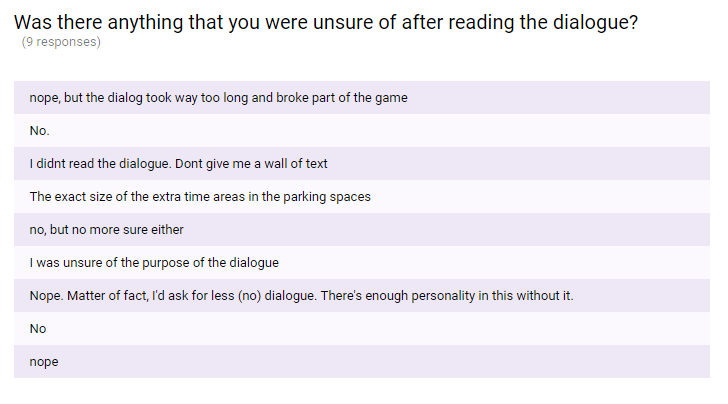
In the final weeks of Scooch play testing, some meaning feedback was flowing in that we took on board to change the game. We added the dialogue system to better teach the player how to play, but the issue that arises with that is that people don’t like reading. A lot of the feedback suggested that the dialogue system didn’t achieve what we wanted and was a waste of time.

ques1

Questionnaire question 1

As you can see with this screenshot, most of the testers seem unsure about the dialogue system and why it exists. So we made some changes to the game, we made the dialogue consist of only 1 line sentences that could be read very quick and also removed the timer that stopped the player from skipping it. We moved the controls out of the dialogue system and put them in the level so that the player learns the controls as they play.

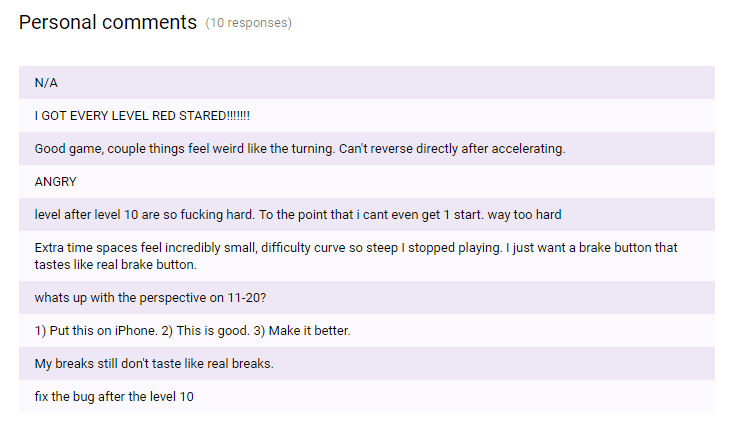
ques2

Questionnaire question 2

Another issue with the late additions to the project was that people were very unhappy with levels 11 – 20. Having half the levels being so disliked and causing people to almost rage quit, was a massive problem that I got to fixing straight away. We had our intended features in place and some time on our hands, so I remade levels 11 – 20 to feel more like levels 1 – 10 to keep the game consistent.

Scooch Feedback & Pivot

As early as the second pitch of project Scooch, we had a playable prototype for people to test. Because of this we were able to get a lot of feedback early on to make the game the best it could be.

When we first came up with the concept we though of  the game Absolute Drift and wanted a very realistic themed game. After the first pitch we obtained feedback on the style we were going for and the lack of story or context. This was our first major pivot, and while being very early in the project I still consider it to be the biggest change yet. After some brainstorming and one of our members pitching an idea to us, we decided to move more towards a cartoon themed game with the player car being a personified character. If I could explain it with two examples it would be the AI robot Cozmo and the film Cars as seen below.

With these changes we needed some world building to further deepen the context of the game. We decided that the AI car now known as ‘Scooch’ is a self driving vehicle created by the company Foogle. The companies scientists are trying to make the AI as safe as it can be to drive on open roads. To reach this goal they setup training areas for the AI to be tested which happens to be the playable levels.

The questionnaire we created for the first play test was not very useful because I found it difficult to think of a question that would provide feedback that we couldn’t get from simply watching them play. This questionnaire had 11 questions;

  1. Was there a moment that you felt Scooch’s movement didn’t reflect your controller input?
  2. How difficult was level 1 relative to the other levels?
  3. How difficult was level 2 relative to the other levels?
    etc…

I think you get the point, these questions while being somewhat useful because these are things that we can’t exactly tell by watching. There is a lot more potential in what could be asked, since at the time there were no plans in changing the level difficulties unless they were extremely unbalanced. Level polish was something we planned for later down the road.

As for verbal feedback and things that we noticed from watching game play, there were a few things that needed immediate attention. The controls for entering levels and navigating the UI were very non intuitive and to be blunt, unnecessary. To enter a level the player would need to press the left and right trigger at the same time, this was because we were trying to restrict all inputs to the left and right triggers, left analogue stick, the B button and the start button. While this seemed like a quirky concept to keep it ‘simplified’, it turned out making things harder. We quickly learnt that drifting away from the universal standard of; A button = accept/enter, B button = decline/exit etc. was not a good idea. From this we did an entire overhaul of the UI inputs and really polished up the UI navigation.

ui

Screenshot of the updated UI

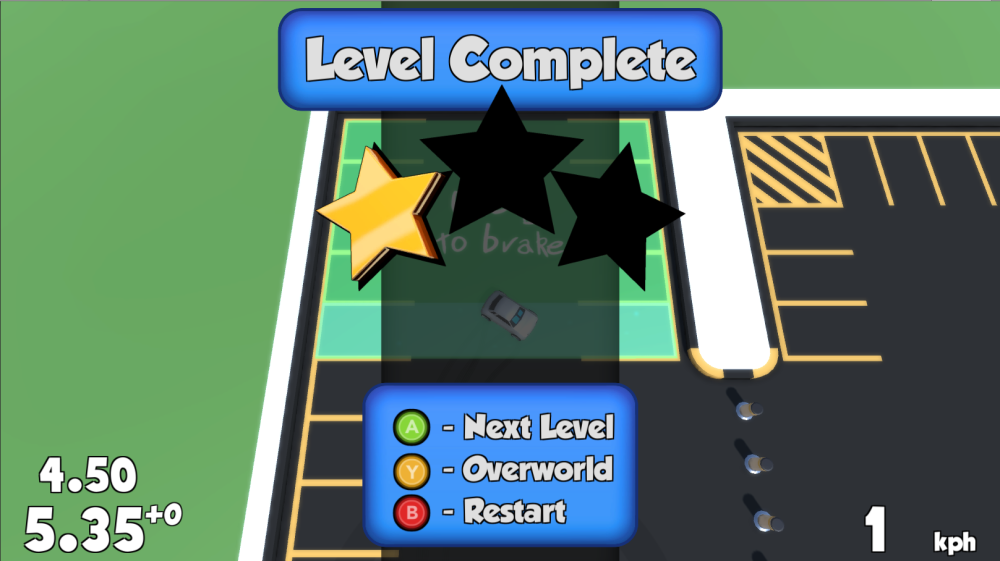
Reaching the end of the projects timeline we also needed to focus on how we would teach the player to play. Throughout the play testing there was always a dev nearby to give a helping hand and while it would be nice, the game client doesn’t ship with a free dev. Something we had in mind since the initial concept was using chalk drawings on the asphalt to communicate to the player the controls for driving. As an example in the first level where the player would accelerate to get to the park and brake to stop. Right in front of the player would be a drawing that displays “Hold RT to Accelerate”. A really good way of thinking about tutorials in general that we got from feedback is ‘right in time > just in case’, meaning that it’s best to tell the player a control when they need it, instead of flooding them with controls right at the start. Because of this something we implemented was having the drawing that teaches braking to the player to be on the parking spot they are aiming for.

With this in place, the first level consists of spawning in, having a drawing in their immediate view which displays, “Hold RT to Accelerate” and then as they accelerate to the target another drawing displays “Hold LT to Brake” and they have learnt how to control basic movement and also what the aim of the game is. From here the second level teaches steering, and at any point in the game where the players current time is greater than the 1 star time, a prompt will appear on the UI telling them to press B to reset the level.

2016-12-09_18-50-57

Gif of the tutorial elements in the first level

With all this in place, we needed more feedback on how well the player could learn the mechanics without being told what to do. I made an updated questionnaire with the following questions;

  1. Was there anything you were unsure of after reading the dialogue?
  2. How intuitive did the controls feel?
  3. How did the most efficient path to complete a level feel? (satisfying, sloppy, boring?) Explain.
  4. How would you describe this game to someone who has never played it before?
  5. Personal comments?

So this time around I think these questions are a lot more useful and are able to get the necessary feedback to make the final changes to the game. The main issue the play testers had was the levels 11 – 20 which were later completely redone by myself to fit more in with the first 10 levels. For question 2, knowing how well the player can control the car with depth of the current tutorial is a must so that everyone can pickup and play. For question 3, the initial design concept of the game is ‘the fastest way to complete a level will be the most satisfying drift’ is something I have tried my best to stick to. Getting good feedback on this question was a massive plus for the team. Question 4 is kind of an oddball, but It’s nice to know how our game would be passed through word of mouth and compare it to our razor statement. The final question being an open paragraph for any personal comments just allows the tester to get anything of their chest either good or bad that lets us see how the game impacts them.

Image and Particle Effects in Unity

Now that we are in the polish stage of our third project, we had to think about some particle effects and lighting effects that we could use to make the game feel more complete. Using the Unity standard assets, I added some image effects to make the game look more unique and less like a Unity prototype. I utilized Unity’s particle system to make a simple particle effect that adds a bit more impact to the players actions.

Screen Space Ambient Occlusion

The first thing I added was Screen Space Ambient Occlusion (SSAO), this is a more efficient way to implement Ambient Occlusion. What ambient occlusion does is adds a black gradient to corners so it looks more realistic. As seen in the below image, the left scene has SSAO disabled and the right has it enabled.

Fig 1. Screen Space Ambient Occlusion Comparison

An issue that we have noticed in Scooch is that players have a hard time distinguishing corners due to the angle of the light and the colours of the materials. Adding SSAO seems to be the best option to fix this because it also makes the space more visually appealing. In the image below to the right, the curb material is the same as the asphalt so it seems as though there is no edge. Now on the left image where SSAO is enabled, it is much easier to distinguish between the ground and the obstacles because of the darkened corners.

ssaoscooch

SSAO Comparison in Sooch

Bloom

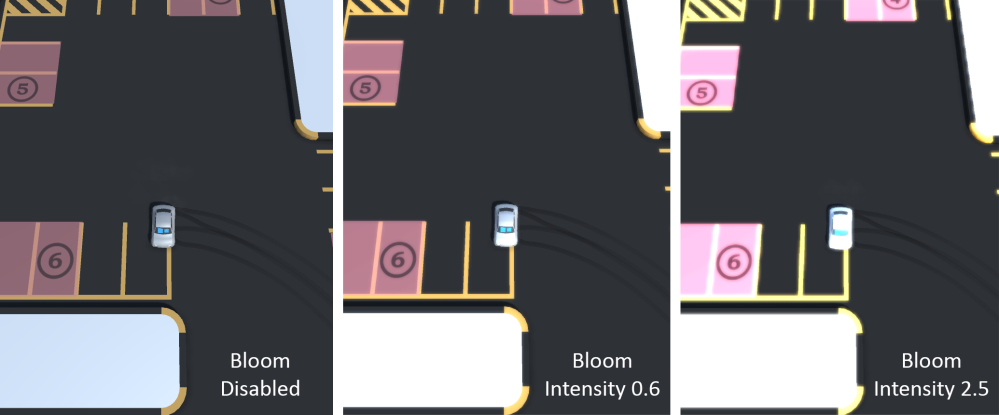
The image effect I used to adjust the lighting is called Bloom. What bloom does is intensifies the lighting and makes it bleed out to give it softer edges. Bloom can be a delicate effect because it is sometimes be overused in games similar to lens flares. Fine tuning the variables of the bloom I think is very important so that you get the intended effect perfect. As seen in the image below, the left shows bloom disabled and the right enabled. If you’ve ever walked outside after being in a dark room and the light is almost blinding, that could be comparable to having bloom at maximum intensity. The effect is supposed to imitate that effect that human eyes have, and it can do that really well combined with other effects.

Fig 2. Bloom Effect Comparison

Because Scooch is a light hearted game we wanted is to look brighter with the bloom effect. As seen on the image below, the far left box shows Scooch without any Bloom effects applied. The world looks too bland for our liking and has the same lighting as a default unity project. On the opposite end of the scale, the image to the far right has bloom intensity set to max, and as you can see the edges become so soft that it is difficult to see them at all along with the increased brightness. The middle image shows the bloom effect at 0.6 intensity which is what I ended up sticking to. It is still easy to distinguish edges as well as bringing that bright and fuzzy lighting effect that makes the colours pop.

scoochbloom

Bloom Comparison in Scooch

Particle Effects

On top of the image effects we decided to add some particle effects to the game. Particle effects can really bring a game to life. This image below is just a small palette of effects that show what can be done within Unity’s particle system. Particle effects can be used for a number of things including smoke, fire and explosions to name a few.

Fig 3. Unity 3D particle system

We already had a few particle effects in the game that were being used for idle objects such as the time pickup and the bonus parking spot. I decided that I would add a small explosion effect to the time pickup whenever the player picked it up. Previously when the player collected a time pickup it would just disappear and it felt underwhelming. To fix this I added a particle system to an empty object and made a simple script for it that destroyed itself after a set lifetime. I had tried to put the object as a child to the item pickup, but the way the pickup object was setup was that after being collected by the player it would deactivate itself along with its children. Using the separate object with the separate script meant that I could just make it instantiate the pickup effect object before it disables itself and the particle effect will still play out. In the below images, the right one shows the current time pickup effect that was already in place and the left image shows the new pickup effect that I added. As you can tell they maintain the same theme for consistency.

References:

Figure 1. (n.d.) Screen Space Ambient Occlusion. [Screenshot]. Retrieved from
(http://i148.photobucket.com/albums/s29/meshula/AO3.jpg)

Figure 2. (n.d.) Bloom Comparison. [Screenshot]. Retrieved from
(http://www.radioactive-software.com/gangwar/glow/BloomComparison.jpg)

Figure 3. (n.d.) Particles 102. [Screenshot]. Retrieved from
(http://i.imgur.com/mF8f34K.gif)

Deception Feels Good

With my initial focus of Scooch being the game feel and the cars drifting functionality, there were some immediate issues that needed to be fixed in order to make the game “seem” realistic. If anyone doesn’t know about the term “Drifting” than here’s a crash course. Drifting is known by many both young and old as sliding around corners, typically acknowledged through popular media such as the movie Fast and the Furious: Tokyo Drift. Now there’s a lot of physics behind drifting that would ultimately help with creating a good feeling drifting game. I’m no physicist but let me scratch the surface of it with a simple explanation. A powerslide is something most will be more familiar with, this is just gaining momentum and then doing a sharp turn so that the vehicle slides to a stop. Powersliding does not require any use of throttle or proper use of steering, therefore Powersliding =/= Drifting.

oversteer

Oversteer Diagram

For the lack of finding a better diagram, here’s one I made in Photoshop. Drifting is essentially controlling an oversteer using throttle and steering to maintain the intended drift angle. An oversteer is determined by the difference between the front and rear slip angles. In this diagram we can see the direction of the wheels and the velocity vector. The front slip angle is the difference between the front wheels direction and the velocity vector. The rear slip angle is the difference between the rear wheels direction and the velocity vector. If the rear slip angle is greater than the front slip angle, then it is an oversteer. If the front slip angle is greater than the rear slip angle, then it is an understeer. During the drift, the front wheels guide the cars direction as it goes around the corner and the rear wheels add force to maintain the cars momentum.

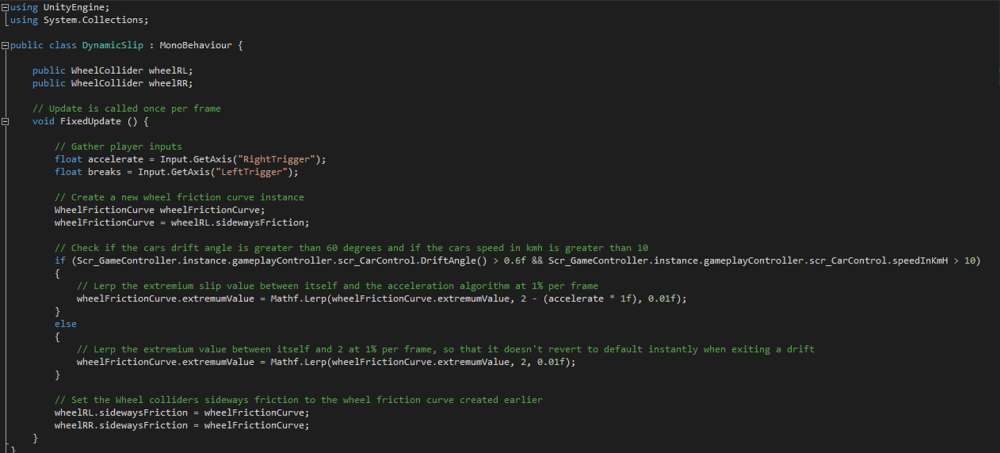
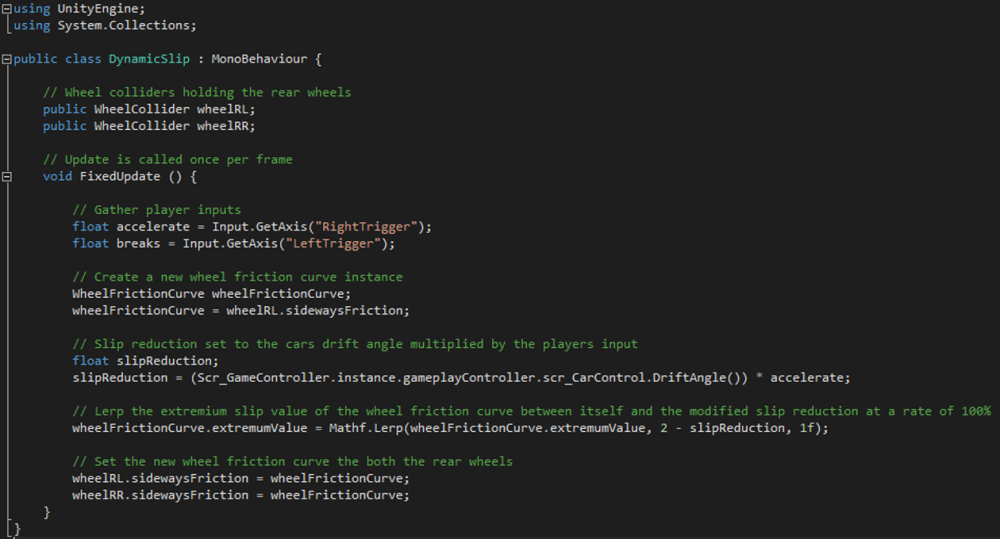
So now we have the boring physics out of the way, lets talk about how we implemented this into our game. The car controller that we used for this project utilized an all wheel drive vehicle, the controls were really fluid and the playtester’s really enjoyed the way the car drifts. The main issue with this is that in the real world, all wheel drives can’t “drift”, sliding in an AWD vehicle is much easier than RWD and doesn’t use the same concept as RWD. This was definitely the case in the current prototype of Scooch, the player simply needed to turn full lock and full throttle to get the perfect drift. Being a time trial oriented game I didn’t see this being able to maintain the players interest because there’s no way to advance their skill, the game needed to have a steeper difficulty curve; ‘Easy to pick up, Impossible to master… sort of’. So I opted to create a simple script that would dynamically change the rear wheels slip depending on the players acceleration input. This meant that if the player held full throttle then the car would have increased slip amount. This is meant to simulate how wheel spin works in the real world, which is when the torque of the wheels overcome the wheels grip on the road which is essential to drifting.

dynamicslip1

Initial dynamic slip script

The initial version of the script used if statements to see whether or not the player vehicle is at a certain angle and a certain speed before applying a linear interpolation on the extremum slip.

dynamicslip2

Updated dynamic slip scipt

Once the code functioned as intended I passed it off to our programmer to fix up the structure. After some code polish from our programmer, the function doesn’t rely on if statements anymore and just uses a separate variable to alter the vehicles extremum slip.

The Rise of Scooch

For the third project of Studio 1 we were given a fairly broad selection of design compared to our previous projects. Only limited to “no complex bipeds” as well as a set list of settings, this gave us a lot of choice in what we were going to make. Our group decided to go with a combination of parking simulator and drifting games. This utilized the outdoor car park setting and also doesn’t involve any complex bipeds.

ezgif-com-optimize_2

Absolute Drift

A current game that heavily influenced the design of our game is Absolute Drift. This game creates an extremely satisfying game feel while also having surprisingly realistic car mechanics. We wanted to create a game with a focus on a single interesting mechanic and then polish the crap out of it, rather than flooding the game with many mechanics that may not be individually interesting or may have poor dynamics.

During the lesson where we were briefed on the project, we brainstormed some concepts. Some of the ideas included, interacting with NPC’s on a train platform to figure out what train to catch. Navigating a packed parking lot trying to reach a parking spot before an NPC vehicle. And finally Scooch, taking that boring parking sim concept and applying it to a faster paced drifting game.

level-3

Scooch Early Prototype

As the designer, the ultimate goal I had in mind for Scooch was to provide the player with the ability to execute the most satisfying drift. At the time I had been into the recently released video game Forza Horizon 3 which is a racing game with incredible drifting capability. It has a whole community surrounding drifting alone. So I had a clear view of the experience that the player would feel when playing Scooch. As for the games concept, in the early version of Sooch we had no story or reason as to why the player was doing drifts in some random parking lot. So we added context to the world, the player is playing as an AI vehicle that a multi billion dollar company ‘Foogle’ has been constructing. Unfortunately the government is not satisfied that the AI vehicle is safe enough for open roads and must undertake a series of testing levels to prove its ability.

Here’s a gif of the early prototype we showed in our pitch that shows off the main concept of the game. Each level will have obstacles such as the cement islands and the orange vehicles parked in the gif that will give the player a time penalty. There will be other obstacles such as traffic cones and wooden boards that move along tracks to represent pedestrians without actually giving the player the ability to murder people.