Week 12 Blog – More Assignment

So it’s week 12 and I’ve got until the end of the week to finish my assignment, I think it’s safe to say it’s crunch time. Last week I talked about how I used coroutines to get a gather mechanic working in my assignment and how I will do a similar method for my combat units. So this week I’ll gloss over how I accomplished just that and how the combat coroutines differ from the gather one. I’ll also explain my method for building placement since I’ve got it working for the most part.

Currently I have the functions working for two combat units including a warrior and a mage. The warrior uses melee attacks and the mage fires lock on magic missiles. Just like the worker the coroutine is started from the selection manager script but instead of having the resource type parsed as a string, the combat units require a target parsed as a game object. The coroutine itself functions almost the same as the workers so I’ll just explain the differences. When the warrior reaches its target the coroutine will wait until the attack timer has reset before dealing damage.

For those who don’t know the attack timer is a simple concept that manages fire rate. To implement this you need two floats, I call one attackTimer and the other attackRate. The attack timer variable doesn’t need to be set to anything initially and the attack rate is the amount of seconds of delay you want between each attack. Before a unit attacks it will check if the attack time is less than Time.time. Because attack timer is not set then it will be less than the current time. After the attack the attack timer variable is then set to equal Time.time + attackRate. So basically if I attack at 20 seconds into the game and my fire rate is 2 seconds, then attack timer will be set to 22, the attack command will not activate until the current time reaches 22 seconds which is 2 seconds after the initial attack.

Moving on, the TakeDamage function is something that both the enemy units and the player units have. It’s just a function that subtracts damage from the units health, the damage is a float that is parsed when the unit deals damage. After the warrior deals damage the coroutine is restarted and the current target is parsed through again so it will attack the same target. Much like the worker coroutine there needed to be many if statements to make sure the target wasn’t null, but in this case instead of stopping the coroutine like with the worker, the combat unit will search for another target within a proximity.

warrior.png
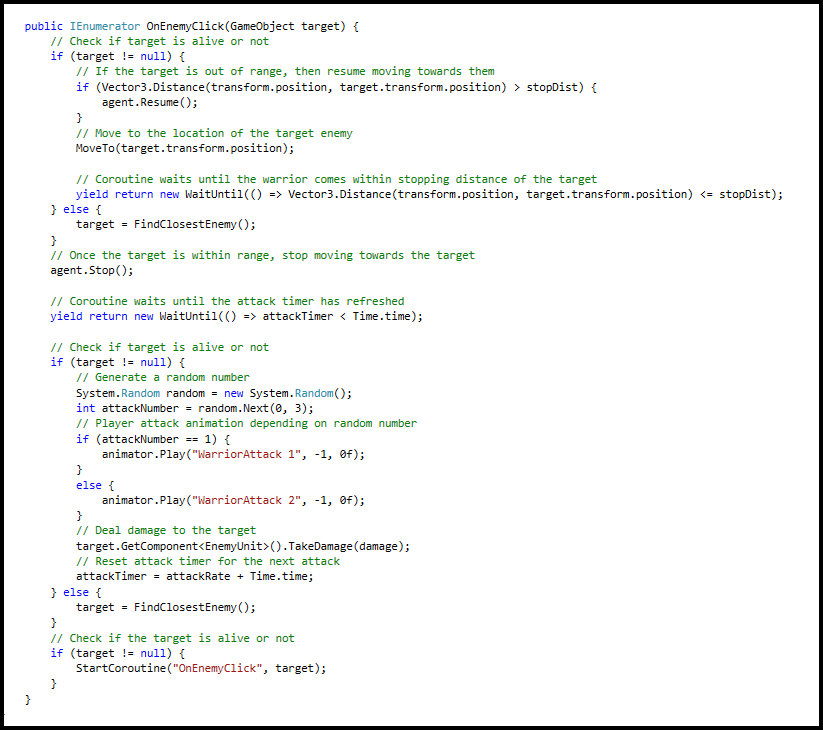
Screenshot of the on enemy click coroutine in the warrior script

The FindClosestTarget function is an important feature to my game and helps with the automation of combat so that the player can have multiple processes running at any given time, this is why I used coroutines in the first place. I learnt this method earlier on in Scripting 1 and it took me a while to wrap my head around. This function returns a game object, at the start of the function a new array is created, in the case of the player units the array just gathers all the enemy units in the map. A new game object is made called target and set to null. Then a float called distance is set to the max range, sometimes this is set to infinity if you wish to check targets from any range. The function checks if the array length is larger than 0 and then for each enemy unit in the array it will set a new float which is called diff (difference between 2 the units) and it is set to the distance between the player unit and the enemy unit using Vector3.Distance. Then an if statement is made and checks if the diff is smaller than the max distance. If it is then the max distance is set to the diff and the target is set to the unit in question. So lets say we have 3 targets, target A is 10 metres away, target B is 8 metres away and target C is 15 metres away. I check if target A is closer than the max distance which in this case lets say its infinity. It is so this becomes my new target and max distance is set to 10 metres. Then I check if target B is closer than the new max distance which it is so now this is my new target and my max distance is set to 8 metres. Now we check target C and see if he is closer than the new max distance, he is not so he is ignored. As you can see this method returns target B which was the closest target.

closest.png
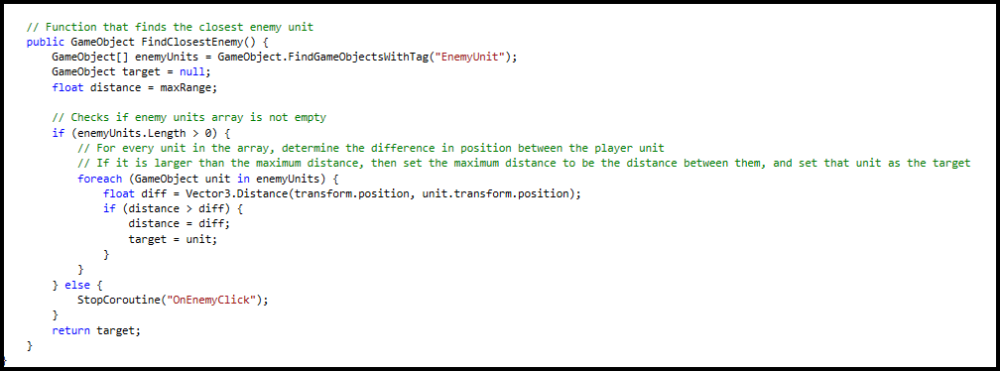
Screenshot of the find closest target function in the player unit script

I have most of my functions completed for the game but I will be polishing up on animations, adding general game functions like pause menu and main menus and maybe even a new unit type before submission. I’m thinking along the lines of an archer that has non lock on projectiles.

Week 11 Blog – Second Assignment

In week 11 I spent most of my time working on my final assignment. At this point I had my coroutines down for my workers and plans to transfer the coroutines over to my other player units. As you may remember from my previous blogs I am basing my game of the traditional RTS style of games such as Age of Empires and Warcraft III. So I needed to have an automated way for the workers/gatherers to gather resources without needing constant player input. I scoured the internet for possible methods to solve my problem and to my surprise there wasn’t many solutions for the specific functionality I was looking for. For similar issues people have recommended invoke repeating and coroutines. Because I have already worked with coroutines earlier this trimester I decided to go with that. For the most part I was going by trial and error since there was no straight forward guide on how to achieve my goal.

To get my gather coroutine started I made a place holder game object and tagged it as “Stone”. Because I had the same functionality from the RTS base from last weeks lesson, I used the selection manager to handle most of the player input functions. In the selection manager script I made an if statement for when the player right clicks and then checks if the ray hit collider tag is “Stone”. If it is then it will start the workers coroutine and parse a string parameter of “stone”. Now back to the worker script where the coroutine is, I started it out with setting the agents destination to the position of the stone object. From here I wanted the coroutine to pause until the distance between the worker and the stone object was less than or equal to a float that I named stopDist. The reason for this float was so that the worker didn’t collide with the object and disrupt the coroutine. To get the coroutine to wait I used the yield return new WaitUntil function. After the worker reaches the stone object then the agent is told to stop, and then wait for an amount of time. To simulate the gathering process I made another yield return with the WaitForSeconds function and gave if the parameter of gatherTime. After it has waited for the gather time the agent is told to resume and then I made a new boolean called hasStone which is set to true after the agent is resumed. After the worker has obtained the resource they are told to move to the outpost which is the main building where the resource is stored. Again the coroutine waits until the distance between the worker and the location is below the stopping distance float. Once the worker reaches the outpost the stone resource is increased by the gather amount, the hasStone bool is set to false and then the coroutine is restarted.

Though this did work very simply, it wasn’t until I made resource deposits have a maximum gather amount before they get destroyed and got multiple workers going at a time that I realised I got many different errors. Basically when a worker is in the middle of the coroutine and another worker drains the same resource the first worker is going for. The console returns an error because the target resource the first worker had is now null in the middle of its coroutine. To fix this (sort of ) I basically filled the coroutine with heaps of null checks. After getting the coroutine running smoothly I added the lumber resource and got a decent gather mechanic running.

gather.png
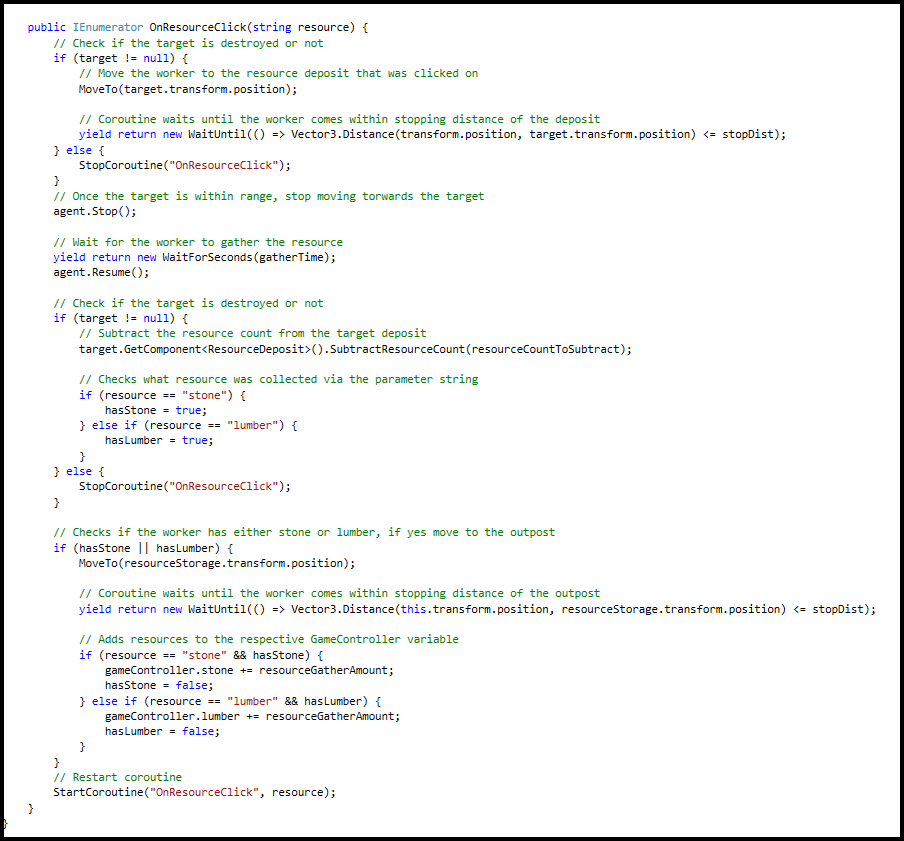
Screenshot of the completed gather resource coroutine

Now that I got the gather coroutine finished for the most part I need to get started on the combat units coroutines which will use a similar coroutine. I’ll also be adding a building placement feature which will drive this game forward allowing the player to spawn more units and gain more resource income. Much like the traditional RTS games I mentioned earlier.

Week 10 Blog – Real Time Strategy

In week 10’s class we started working on the RTS game brief. For those who don’t know RTS stands for Real-Time Strategy. Games in this genre include Warcraft III, Age of Empires and Starcraft 2. These games usually have a resource system and have player controlled units that can be moved and commanded in bulk. A short description of RTS according to wikipedia.org “Real-time strategy (RTS) is a subgenre of strategy video games where the game does not progress incrementally in turns”. As the name suggests “Real-Time” means that every process is running in tandem with each other. This requires micro management skills in the player to efficiently control their units, their income and keep up with their enemies actions. Touching up on RTS features is a great thing for me because our final assessment is a resource based game with building placement and unit spawning much like a typical RTS. I plan on going down the Warcraft III and Age of Empires route with my game.

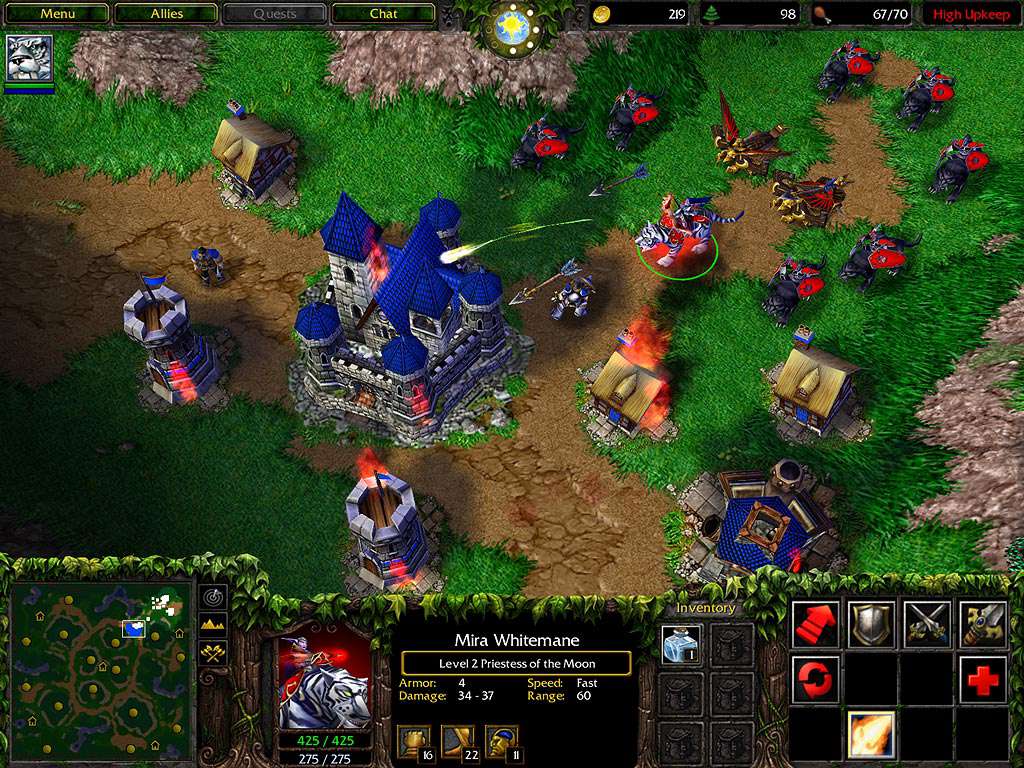
Figure 1. Warcraft III (Blizzard Entertainment)

The first thing we made was a RTS styled camera, this camera can move around using W, A, S, D keys and zoom in and out with the scroll wheel. Though traditional RTS games use the mouse to move the camera by putting the mouse against the border of the screen in the direction that they want the camera to move. A feature of the zoom function is that the angle changes depending on how close it is to the ground. So when the camera is at its maximum height, the angle will be almost perpendicular to the ground, but when the camera is at its lowest point, the angle will be much greater allowing the player to have a greater field of view. To do this the we have two new floats called newAngle and newHeight that are lerped between min and max values respectively. We then set the new angle and new height to the cameras position and rotation so that the zoom functions as intended.

The next thing we got working on is something that is very important to my assessment project. We started on unit selection and movement. We made a new script called SelectionManager which controlled the players inputs involving selected units. In Update we made a raycast that is being cast from the camera to the mouse position every frame. There is a list of game objects called selected units which manages all the of the players currently selected units. The player units have NavMeshAgent component on them and a script that has a MoveTo function that simply sets the agents destination to the parsed Vector3. When the player right clicks on the ground a for each loop will start that calls the MoveTo function and sets the parameter to the raycast hit position.

If the player left clicks and the ray hits then it will instantiate a game object called selection trigger. This object is a simple cube with a SelectionTrigger script attached with a scale of 0, 0, 0. When the selection trigger is instantiated, it is fed the information of the mouse positions. Mouse position A is where the player first clicked to instantiate the object and mouse position B is currently nothing. In the selection trigger script the mouse position B is set to be the position of the mouse using a ray cast in Update. The game object is scaled using mouse position A – mouse position B. This means that when the player clicks the ground and instantiates the object, a corner will be at the point it was first instantiated and then the opposite corner will be at the mouse’ current position. If any player units enter this trigger then they are added to the list of selected units.

References:
wikipedia. (No Date). Real-Time Strategy. Retrieved 25th August 2016 from https://en.wikipedia.org/wiki/Real-time_strategy

Figure 1: https://cdns.kinguin.net/media//category/w/a/warcraft3_hir0614_06-1024_1.jpg

Week 9 Blog – Mecanim and Camera Stuff!

In week 9’s lesson we worked further on the side-scroller game with the addition of a second player and a dynamic camera. At this point the game is drifting away from the intended concept which was meant to be similar to Limbo or Trine. This side-scroller is turning more towards a fighting game using multiplayer input and a camera that moves based on the players positions and the distance between their positions.

First off we added the player 2 character models and animations much like the first player character. This time we opted to use Unity’s Mecanim feature which uses an animation controller. To use an animation controller there must be an animator component on the player rather than a animation component. Using the animator is pretty straight forward if you know how to use the animation component. I think the animator does a much better job at visualising how the animations work and also make it much easier to handle animation transitions

Typical setup in the Visual Programming Tool and the <span class="doc-inspector">Animation Preview window</span>Figure 1. Screenshot of the Animator window in Unity

We set up the second player character controls similar to the first but instead they use the arrow keys so the two characters can be controlled from the same keyboard. Now that we had two playable characters with animations, we needed to work on the camera. The main idea behind this camera is that both the players should be visible when they are on opposite sides of the map, but the camera should also zoom in when the players are right next to each other so you can see whats going on more clearly. To do this we made a camera script which would control the cameras position. In this script we made a new Vector3 which the camera position will be set to. First off it finds the mid point between the 2 characters which is a simple player 1 position + player 2 position divided by 2. Next we need to find the amount of zoom we want for the camera, to do this we find the distance between the 2 characters using Vector3’s Distance function and then clamp the distance float between min and max values. We take the previous Vector3 that we made and set the Z axis to be the clamped distance we just calculated. The final adjustment is just a Y axis offset that ensures the camera is not on the floor. Finally we set the cameras transform position to be equal to the Vector3 we created and it should result in the camera staying in the middle of the two players along the X axis and also zooming in and out along the Z axis depending on how far apart the players are from each other.

camera.png
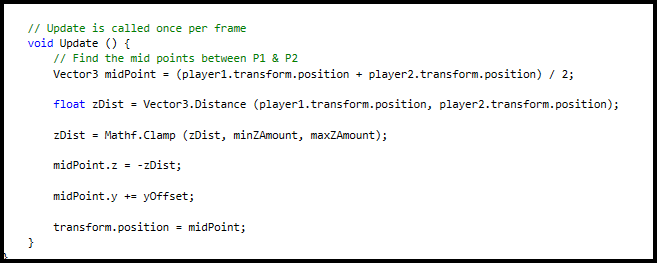
Screenshot of the camera script

After this lesson the animator was still a bit blurry for me so I will need to touch up on what we’ve worked on in the last 2 lessons. The camera function was really interesting for me, as a designer I enjoy making cameras and movements that are dynamic depending on the situation so this particular solution was very intuitive.

References:
Figure 1:
http://docs.unity3d.com/460/Documentation/Manual/MecanimAnimationSystem.html

Week 8 Blog – Side-Scroller

In week 8’s lesson we started working on a new game which is a 2.5D state driven side scroller. This brief is mainly focused on player states and animations as far as what we learnt in class. Animations is something I’m passionate about because I think it’s a very important component to developing games.

After getting some simple play movement out of the way we set up some platforms for the characters to stand on. To give a brief example of the animations system, we firstly made one of the platforms move side to side. The problem that emerges here is that when the player jumps onto the moving platform, they do not move with it like they would in real life. To fix this we set up an OnCollisionStay, if the collider is the moving platform, then it will be set as the parent to the players character. So as long as the player is in contact with the platform, the player will move with the platform. This makes some interesting side effects such as getting grabbed by the side of the moving platform and being dragged off the edge resulting in the player falling into the endless void.

platform.png
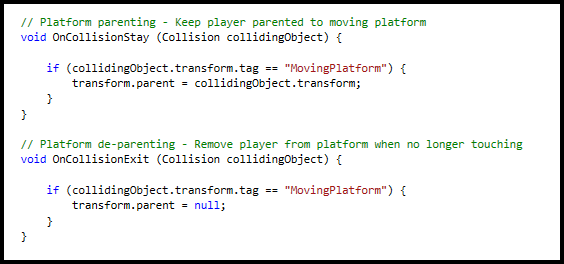
Screenshot of the OnCollision functions for the platform parenting

Next for the player state and animation, we made a set of player states including idle, walk, jump and attack. These were the ones we added animations for at least. Then in a seperate script called PlayerAnimation we made a switch in the Update method. This switch plays the appropriate animation depending on the players current state.

switch.png
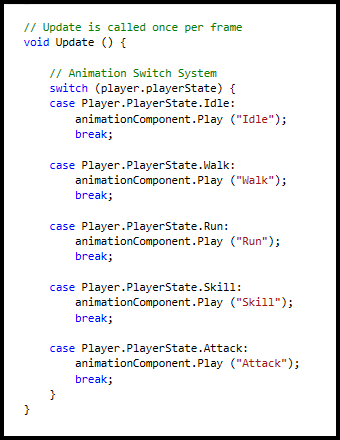
Screenshot of the animation switch from the player animation script

Next we made a function for player input called Controls where we would place the functionality for attacking, walking and jumping. For the attacking and jumping we used a new method known as a coroutine which is great news for me since I plan to use these in my final assessment. For this to work there is a new IEnumerator called animation delay which was a new method that takes two parameters, a player state and a float wait time. This method sets the players state to be the same as the parsed player state, sets the animation lock bool to true and tells the coroutine to wait for the parsed wait time before continuing, it will then set the animation lock to false before ending the coroutine. In the attacking function where this coroutine is called, it parses the attack player state as the first parameter and then it retrieves the animation component on the player to find the attack animations length and parses that as the wait time.

coroutine.png
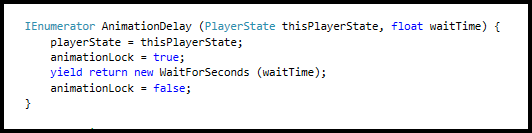
Screenshot of the animation delay coroutine

platform.png
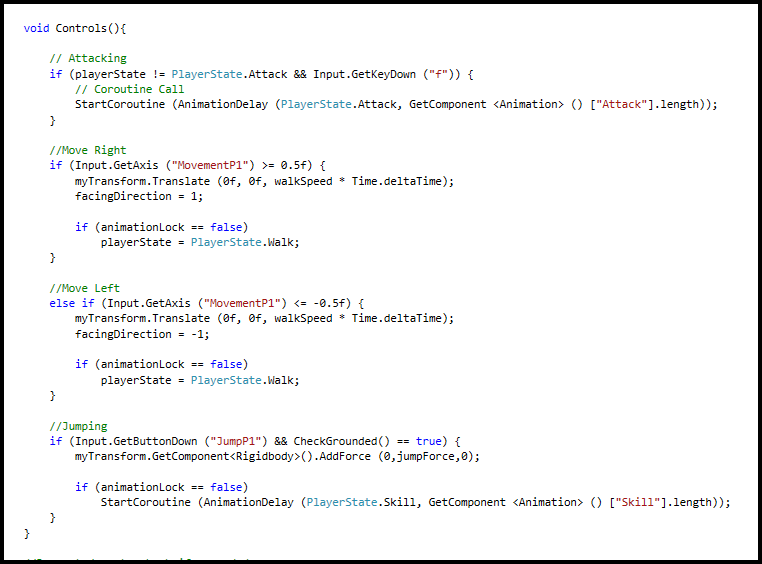
Screenshot of the player controls function

For the movement controls we set up out own inputs in Unity to control movement with GetAxis rather than GetMouseButton. This part of the controls function simply checks if the axis is greater than 0.5 (or lesser than -0.5 for the opposite direction) before moving the character and changing the player state to walk. In Unity we handled the animations using the animation component that can be put onto the player. The animations can be retrieved similar to that of an array but it uses a string instead of an index.

Another intuitive lesson for me, I was able to learn more skills about animation that I can transfer into my final assessment and my future work. Next week we are looking into Unity’s Mecanim feature which is an alternative way of using animations in Unity.

Week 6 Blog – First Assignment

In week 6 we were mainly working on our assignments that were due at the end of this week. Because we didn’t do much work on the FPS survival game I will go over some mechanics I have added for my assignment work.

For this assignment we were to make an artillery game where the player fends of waves of enemies using an artillery weapon with the help of a ballistic equation to provide guidance on our shots. The ballistic equation that I used calculated the distance at which the projectile would fall back to the same level that it was shot from. In my case the weapon was on ground level so the ball would hit the ground at the same horizontal level.

This particular ballistic equation formula is:
distance = velocity² sin(2θ)
                               gravity

ballis.pngScreenshot of Update function in player script

I made a game object sphere with a slight transparency that would act as the target position. I needed the object to stay in front of the players cannon and at the appropriate range via the above ballistic equation. This would make it so that the sphere object will be at the landing position of the projectile when it is fired. To do this I made a function called trajectory destination and added a single line that controlled the position of the sphere object. The transform position is set to equal the transform position of the player cannon plus the transform forward vector multiplied by the range calculated earlier with the ballistic equation. This gave perfect results with the sphere always being located at the balls landing position.

ball.pngScreenshot of trajectory destination function in player script

When the projectile hits the ground it has to deal area of effect damage to all targets in the explosion radius. This is the same functionality used in the SHMUP game where a explosion prefab is instantiated at the projectiles hit point and then all colliders within the prefab are added to a list. A for each loop runs to check the distance of each enemy from the epicentre of the explosion to determine the amount of damage dealt. The closer to the centre, the more damage dealt.

By the end of the week I hope to get proper enemy waves spawning and also a knock back feature that works similarly to the rocket jump feature in the FPS survival game. Also getting a solid point system is in the works so that the more enemies killed with a single explosion, the more the player is rewarded. If this is the case, the designer in me can’t help but think of a health bar system for the enemies so the player can judge the best place to hit for maximum points. Though I may not because it is not required.

Week 5 Blog – Expanding the FPS

In week 5 we continued working on the FPS base provided to us in week 4. This lesson we focused on adding the ability to change the equipped weapon as well as a score multiplier.

A quick tip on what ‘weapon switching’ is, or more formally known as ‘real time weapon change’. Real time weapon change as tvtropes.org describes it is “The ability to change your weapons in a video game without pausing or using a power-up to change them”. “This usually involves a trade off of convenience and versatility, since pausing gives time to choose almost any weapon, while this trope usually limits the weapons in order to save for time”. Weapon switching is seen throughout most action games usually via the scroll wheel on PC and the D-pad or Y / triangle button on consoles. Though for this game we are simply going to use the number keys for switching weapons.

The change weapon was relatively straight forward, the weapon we were implementing was an assault rifle which had all the required assets to fire and deal damage. The solution to the weapon changing was a simple case of making an array with both the rocket launcher and assault rifle in it, and then when either the “1” or “2” key is pressed, change the SetActive of each weapon. So when the player presses “1” the first weapon in the array is set to true and then second is set to false and vice versa when the player presses “2”. We also added a function that checks if the player is currently reloading so that they cannot change weapons while reloading. This was just a simple case of an if statement inside the Update function that would call the change weapon function.

change.png
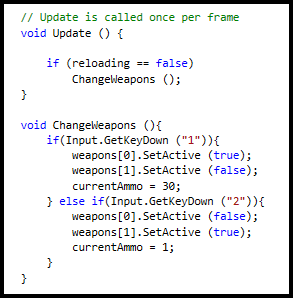
Screenshot of the change weapons function

For the score multiplier we made some modifications to the AddPoints function located in the game manager script. Prior to the multiplier the function would just added the parsed integer and add it to the players score. This function is called every time an enemy dies, what it does is increments the multiplier if an enemy is killed within 5 seconds of the last enemy. So what the code does is, checks if the last enemy was killed within 5 seconds, if not then set the multiplier to 1, if yes then increment the multiplier. After the multiplier is set for this kill, add the parsed integer multiplied by the current multiplier to the players score. Then it sets the multiplier timer to be 5 seconds from the current time so that the next kills interval can be determined.

points.png
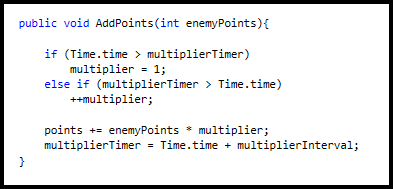
Screenshot of the add points function

While not a very brain heavy lesson this week, our lecturer did give us time to try and make our own solutions before giving his own solution. Even with the simple problems trying to figure them out by yourself is quite productive and I ended up learning more than I expected. I managed to butcher the multiplier system with my trial and error solutions but I feel like I was on the right track with my methodology.

References:
tvtropes.org. “Real Time Weapon Change” (No Date).
(http://tvtropes.org/pmwiki/pmwiki.php/Main/RealTimeWeaponChange)

Week 4 Blog – Survival FPS

In week 4 we started working on a first person shooter survival game much like Devil Daggers or Killing Floor. We were given a base including basic player controls and a level to start adding some features.

The first thing we added was enemy navigation using Unity’s NavMeshAgent. This is a great tool because it allows you to learn simple game development without having to learn complicated navigation systems such as A*. We learnt how to bake the area and tweak some of the variables to get the intended results. At this point the enemies would just beeline to the players location disregarding any obstacles. To fix this we were introduced to NavMeshObstacle which is a component you can place on objects to make the NavMesh bake around the obstacles position. Placing the obstacle component on a small wall located in the middle of the area and a barrel, it would result in the enemies avoiding them only traversing the blue area as seen below.

bake.png
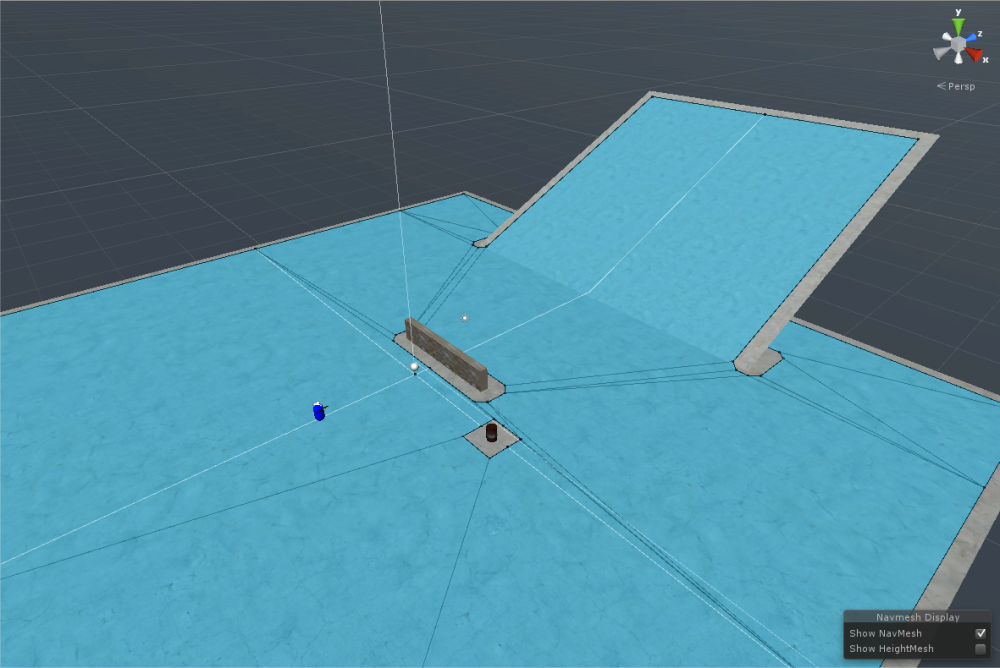
Screenshot of the NavMesh bake in Unity

After getting the basic enemy navigation down we moved on to the players arsenal. The first of which was a rocket launcher. The rocket launcher had mostly everything implemented already including firing and reload animations, rocket travel and smoke trails, and even the explosion effect. But it did not have any damage, the damage that we put in was the same as the SHMUP nuke. When the rocket collides with anything, it would instantiate an explosion prefab that would collect all enemies within its trigger and add them to a list. Then it does a for each loop on the list to find their distance from the epicentre of the explosion and deal damage accordingly.

explos.png
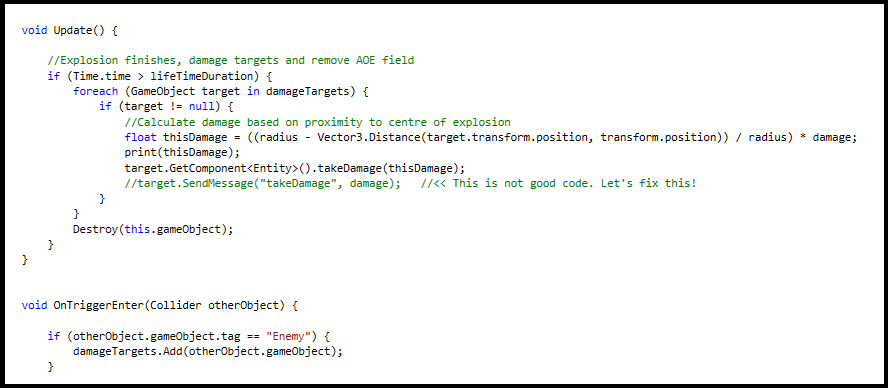
Screenshot of the explosion script

Another function that we added was a rocket jump, because you can’t have a rocket launcher without rocket jump! I found this very interesting, it opened up my mind to how vectors work a bit more. We had to determine what direction the player would be forced in relative to where the explosion happened. It would take the player transform position and subtract it from the explosion prefabs transform position. This would return the vector directly opposite to the player, relative to the explosion. The main problem with this is that the rocket launcher is located on the players right hand, so when you fire at the ground it would always force you to the left a bit rather than straight up.

rocketjump.png
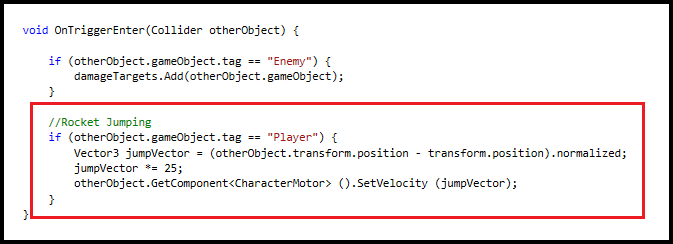
Screenshot of the rocket jump function

rocket jump.png
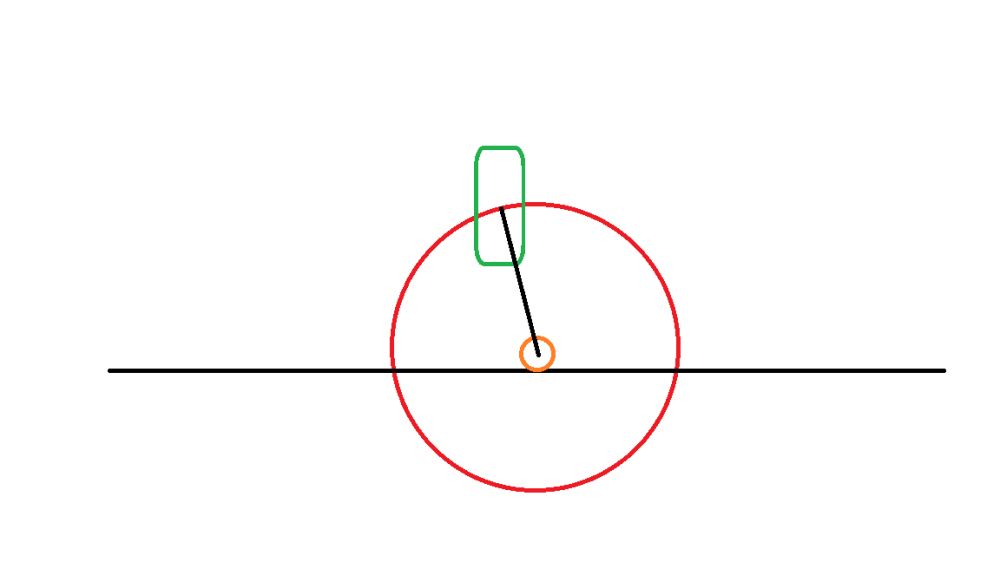
Here’s a little illustration our lecturer gave on how the rocket jump functions (the orange circle is the centre of the explosion, the green capsule is the player, and the black line between is the vector)

This lesson was a nice collection of new knowledge. I learnt how to use player navigation and use vectors in ways I had not even considered in the past. This is great because I will need both of these solutions for many of my future projects.

Week 3 Blog – Even More SHMUP

Over the past week I’ve added some simple mechanics that I had planned for including a round / wave system and a simple weapon upgrade system. The weapon upgrade system is what I spent most of my time implementing, it included a spawner that moves side to side off screen and will drop a weapon upgrade on a timed interval. I took inspiration from older SHMUP’s where the upgrades would come down in a random area and the player would have to constantly be aware of where the upgrades are coming from, rather than the spawn positions being static and predictable. When the player starts a new game they will only have the “Laser Mk1” and the “Missile Mk1” which utilise the front two muzzles on the players vehicle. Every time the player picks up an upgrade, an extra two muzzles will be usable. Finally I added some UI elements so that the player can see what round they are on, their current score and their current weapon upgrades.

UIPS.png

This week in class we were introduced to splash damage which was very interesting, we were given a few minutes to try and implement it our selves. My method was on the right track but definitely not functional. The attack we were implementing was a nuke, basically a panic button that would deal damage to any enemies in proximity of the blast, dealing more damage to targets that were closer. This mechanic took up most of the class time because of several bugs and necessary tweaks. In the end I got mine working exactly how I wanted and now I’m curious on how this can be implemented to future projects since splash damage is a very important mechanic in video games. I started adding a new enemy type which would shoot projectiles towards the player which I want to improve on before next week.

For this week I want to add a lot of things, including; difficulty increase per wave, splash damage on the homing missiles, different levels so that I can implement a boss, audio for weapons, explosion effects for enemies and the player, separate upgrades for the laser and missile projectiles to make for a bit more complex weapon selection and also the new enemy type. On top of this there many small changes I want to make for existing functions such as changing the upgrade spawner to drop upgrades depending on the players achievements rather than on a timer which was more complex than I had originally thought as well as general aesthetic elements such as visuals and UI tweaks.  I think I’ve set the scope for this week a bit too much but I’ll try and get most of this done since we are moving on to different projects starting next week. This will most likely become a personal project of mine to continue adding to this SHMUP.

Week 2 Blog – More SHMUP

This week we worked on adding homing missiles for the players arsenal as well as giving enemies health values and projectiles damage values so that every attack wasn’t a one shot. The function behind the homing missiles was quite complex and took up a majority of the class. We did a similar function in a previous assessment so it wasn’t that difficult for me to grasp. On top of finding the closest target, the missiles had to lock on. To do this a new quaternion is made in the missile script and it is set to equal the quaternion method called LookRotation which takes a vector3 to look towards. To get the vector3 to look towards we do the missiles position subtracted from the enemies position. After this we set the missiles transform rotation to be a spherical linear interpolation which takes 3 parameters. We parse the missiles rotation, the quaternion that we calculated in the previous line and then the rotation speed multiplied by delta time. Messing around with this projectiles values made for interesting results, changing the rotation speed and adding a rigid body created an entertaining visual to say the least, almost like something out of a psychedelic video game.

quaternion.png
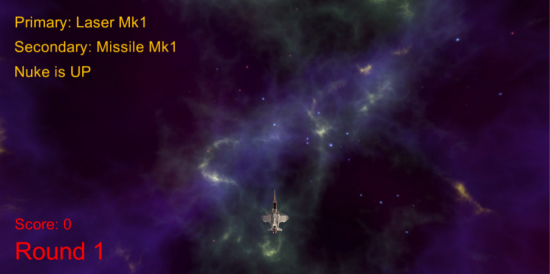
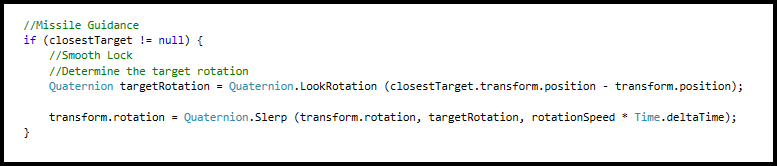
Missile guidance functionality

Now that we had multiple weapon types it didn’t make sense that every projectile was a one shot kill so we implemented health values for the enemies. Next was the player weapon damage values which was mostly personal preference, personally I went with 10 damage on the lasers and 25 damage on the missiles. To apply the damage to the target I used a take damage function that is placed on the enemy. When the player projectile hits the enemy, it retrieves its component and calls the take damage function and parses through the damage of the projectile. Now the SHMUP started to feel like a playable game, it provided a challenge with some interesting weapon mechanics. Although the player didn’t have any health values, that’s definitely something I hope to add during the next few weeks.

Before next week I want to tweak the spawner, weapon and movement variables to make the game more aesthetically pleasing and give a more balanced experience. I want to add some game manager elements such as rounds where the enemies difficulty will increase as well as a weapon upgrade system. For the time being I’m keeping the concept for the upgrades simple such as starting out with only the front two muzzles activated at the games start and increasing by two per upgrade pickup.