High Concept Document

What is the contents of a HCD and what is it useful for?

A high concept document is like a resume for your game. It should contain enough information on a single page so that anyone that reads it can understand your game enough to decide if they want to collaborate with you.

The Contents:

High Concept:
You can think of this like the elevator pitch or a razor statement. The idea behind the high concept is to explain the games concept in only a couple of lines. This should give the reader a good idea of the concept without needing to think too hard.

Features:
A list of the key features should be included so that the reader can get a better understand of how the game works. Choosing what features to display here is important because you only want about two or three sentences per feature. This should explain the players experience and give the reader a mental image of how the game will play out, so make sure not to add unnecessary things such as physics or AI.

Target Audience:
A brief explanation of who the target audience is and why. This can include age, sex, or even people with certain interests.

Competition:
This section explains if there are any other products on the market like this one, and if there is how would this project compete with it.

Platform & Engine:
Knowing what platform the game is designed for and what engine it will be using can be the deciding point of whether or not someone will want to work on your game or not. This is an important part of the document.

Selling Points:
Explaining why this game is new to the market and why you believe it will sell successfully.

Design Goals:
A few points describing the design goals for the project can give readers an idea of the users experience. Things such as ‘Fast paced’ and ‘Easy to learn’ can say a lot about your game in a few words. Elaborate on each point with a sentence or two explaining how the game will achieve these goals.

Additional Information:
While this point can be detrimental to the document, it can also be a nice touch to include some interesting facts that the player may want to read about. Because it is right at the end there is nothing stopping the reader from reading if they lose interest and doesn’t take away from the rest of the document. This can include stuff such as concept art or character designs, just anything that sticks out about the game that hasn’t been explained yet.

The Purpose:

Overall the high concept document can be viewed as a sales tool, you can use it to explain to people your concept on a refined document. It is also useful as somewhere to store initial concepts. While brainstorming should be done on a separate document, the HCD serves as a place for your early concept to be written down before any other documentation is written.
Game Design Document

What is the contents of a GDD and what is it useful for?

The game design document is meant to explain the intention of what the game is trying to achieve and also what is in the game from a design stand point. The GDD should be written in a way that it can be handed off to a team member and they understand every aspect of the games design, including the story, characters, gameplay, visuals and sound.

The Contents:

Overview:
An overview of the game will allow the reader to get an idea of what the game is trying to achieve from a paragraph or 2 description. The description should provide explain what aesthetic the game is appealing to and summarize how.

Story / Characters:
An in depth explanation of the story is required in a GDD if there is a narrative at all. It is the main place that the story will be communicated to the team members and should have the most detail it can.

Gameplay:
This is arguably the most important part of the document, it explains how the game is played and what the player will feel while playing.  Having things such as level design information that shows the players learning curve in relation to the level difficulty curve can help justify design decisions and communicate how it should be done throughout the project.

Controls:
Having a section for the controls is necessary if you want to expain how the game plays out. It is an important part of the gameplay to understand how the player uses the inputs. There is a large difference between using a trigger on a gamepad compared to using a key on a keyboard for controlling a cars acceleration. The games control layout should directly reflect what platform it is running on and how it can compliment the intended gameplay.

Visuals:
This is meant to be a quick overview of what the game is meant to look like. It usually contains some concept art or images from other media that help explain the art style. This is further gone into detail with the Art Bible if one exists.

Sounds:
An explanation of the sounds should go into full detail explaining the design decisions around the sounds and how they will compliment the gameplay. This should include background music, sound effects, UI sound, voice lines etc. The document should justify the decisions on the sounds to make sure it is the best it can be.

User Interface:
The user interface needs to be explained because it is a large part of the user experience. It should outline why any UI is present and what each UI element does. It is not meant to be a way to describe what it looks like in detail because that is what the art bible is for. This is meant to describe the functionality of the UI and how it can help teach the player and make the gameplay more intuitive. Having less UI is always a good thing so justifying why any UI is necessary is a must for this document.

The Purpose:

Overall the purpose of a GDD is to provide the relevant context to outside parties that may be collaborating on the project, used as a form of memory since the human brain is limited and unreliable, to account for any changes in the game design that may come down the road and to ensure that the implementation matches the intention of the game.

Art Bible

What is the contents of an Art Bible and what is it useful for?

An art bible is a document that is written by the art director and contains all the information about what the game will look like. This helps with the consistency of the art assets and the art direction which will ultimately result in a more polished looking game.

The Contents:

Art Style:
This can include information such as the time period, to who inhabitants the environment and their methods of construction. This is vital for artist to get an understanding of how the game will look.

Colour Palette:
The colour palette is very important to explain the intended feel of the game as well as the theme of the game. Information can include the colour swatches and their values such as hue, saturation, vibrance etc.

Character Art:
This includes the characters personality, their expressions, their costumes etc. that will help the artists see what the intended character looks like.

Camera:
This explains the camera’s angle, field of view and any effects that may be on the camera. Knowing how the perspective of the camera is very important to understand what the game will look like and where it will be viewed from.

Level of Details:
The level of details explains how much detail should go into an asset. You don’t want the artist to spend a whole day making an asset that is barely see by the player when they could be working on more important stuff. This is a good way to prevent these sort of misunderstandings and also prevent too many questions arising for the artist.

Atmosphere:
The can include information such as the colouring of an area and the weather conditions. It’s a guide to help the artist set the mood of an environment. This can be really important to a games design if it relies on the environments atmosphere.

User Interface:
Information regarding the user interface can include animations, UI design reasoning, how the UI promoted user experience and how the UI will look. Having reasoning behind all art decisions is key to having a consistent art style.

Asset List:
A list of assets will help give the artists an idea of the variance needed for each asset as well as how much work is needed to get done. The level of detail should reflect the amount of assets to make sure the artists are not putting in too much or too little detail into certain assets.

Technical Stuff:
A final section including the technical details should explain what naming conventions are used for the files and what file types should be used. This is absolutely necessary because these files need to be handed off to multiple other people who are not artists and have no idea how the artists name their stuff and what file types they use. The file types should coincide with the file types listed in the TDD so that there is consistency across the board.

The Purpose:

Overall the art bible is an important document especially if your game is very artistic. It provides the artists and new members with sufficient information on how the game should look. It needs to explain why art decisions were made and how the art direction maintains consistency throughout the project. It also helps bridge the gap between game designers / programmers and artists. They come from different areas and may not have the same methods and conventions as one another, so having a document that can explain this so that everyone is on the same page is very important in a project.

Technical Design Document

What is the contents of a TDD and what is it useful for?

A technical design document is used to explain and log everything about the game from a technical stand point. Where a game design document communicates the intention of the game, the technical design document communicates how those intentions will be achieved. A team member should be able to look at the TDD and understand exactly how the game functions.

The Contents:

Overview of features:
An overview of all of the features in the game will explain to the reader the scope of the game and what the game is about.

Technical Information:
This can include information such as what game engine is being used, the system requirements of the game and the video memory calculations. This is used to ensure there are no technical limitations that may cause the program to not operate as intended.

Game Object List:
A list of every logical game object and what they’re purpose is, this can include stuff from a simple wall to a projectile. The character list can also be included with a short description.

Collision Detection:
Information on the objects that can and cannot collide with each other help communicate how the game with operate in the engine and also help with understanding the player interaction.

Object Interaction:
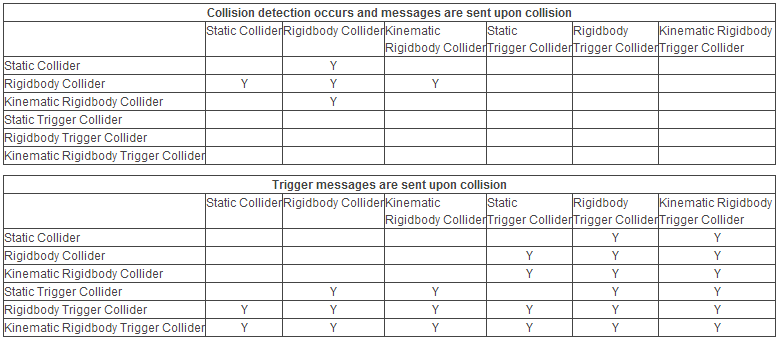
A table that includes all possible interactions between every logical game object in the program will help visualize how the game works. This is extremely important because this is the sort of stuff the team members should know when they start working on the game.

2v6xs

Object interaction table

Art Tools:
A list of the tools needed to make all of the art assets is included in the document. This give an idea of what tools are needed for the project overall and also makes sure the same program is used for every asset type for consistency and smoother workflow.

Information such as the programs version, overview of the product and the exact tools that will be needed for the project is also included. This is so that the members are all using the same version if needed and also know their limitations on what can be used to make the assets.

Scene Management:
This section included the information on how the game moves between scenes and transfers information across scenes. This is important because all games ‘should’ be using more than 1 scene and having a system that can efficient do this is important.

Physics Behaviour:
A description of how the physics behaves in the game such as, “when the player walks into this traffic cone, it will fall over normally” compared to “when the player walks into this traffic cone, it will be knocked away with a small amount of force.” It’s necessary to understand how physics operates in a project if it is applicable.

Task List:
A list of all the required tasks that will be completed in order to finish the project along with who will be completing them. If someone is unsure about a task, they can simply read this section and know who to talk to about the task in question. It helps a lot with team work and workflow.

Schedule:
A schedule that outlines the milestones of the tasks mentioned above is also included in the document. This is included because it helps centralize the data, a team should always have a proper scheduling method, but this shouldn’t conflict because the milestones should be the same all the way through the project.

Artificial Intelligence:
If applicable, an explanation of the AI in a game is extremely important. This will include the structure of the system, the states that the AI can be in and how it moves between states.

Networking:
If the game has multiplayer it is important to have an explanation of how that will work. Even if the game doesn’t have multiplayer, still mentioning that in the document is helpful.

Scripts, functions and variables:
Some TDD’s will include a list of all the scripts used in the game as well as all the functions used in those scripts as well as all the variables used in those functions. This simplifies the programmers workflow down a lot and also helps the designers understand the game better.

The Purpose:

So overall the TDD can be a very important document and should be used if you want to make your game the best it can be. It helps with the workflow and also lessens the amount of required communication between team members by having all the technical information in a central place where it can be used as req gathering. A TDD ensures that the design is doing what it intends by looking at each element of the game in utmost detail. It explains how everything is implemented and why it should be implemented in that way. The document should account for any future changes and explain in detail how things should be changed when they need to be.

Scooch Post Mortem

Introduction:

For project 3 of studio 1 were put into teams of 4 – 6 members and given a brief to make a game with “no complex bipeds”. Our team consisting of 2 designers and 2 programmers decided to go with a drifting / parking game that we later titled “Scooch”. This project had its ups and downs, but overall I think it was a good learning experience for me and my team.

What Went Wrong?

1. Lack of roles within the team.

The roles within the team were extremely vague from the beginning with the only roles designated being project manager and vision holder. This forced us to be flexible and really push ourselves to be competent in all fields. It’s definitely a good learning experience but was not the most efficient way to get things done. I had a constant feeling of “What do I do now?” because I spent most of my time out of meetings and class doing the documentation when I think I could have been contributing more towards the creation of the game since that’s what I enjoy most in development.

Recommendation: Figure out team strengths and weaknesses at the beginning of the project and assign roles accordingly. Even when in such a small team, it’s easy to get lost in the void of “I don’t know what to do”. Having a role gives you a heading and will ultimately help in the long run.

2. Lack of project management.

This one ties in with the first issue, having a lack of roles within the team, and also having a lack of project management left us in an awkward state. One of our members was extremely motivated about this project that despite not having project management, they continued to work through. This left the rest of us kind of in the dark, we couldn’t allocate tasks to everyone or get a proper understanding of how the early builds of the game worked because one person was soloing the project and had not made the source files publicly accessible yet. The majority of our contribution to the project was attending meetings, brainstorming and helping create the game in an over the shoulder way. We still had an impact on the game, but it wasn’t a team effort.

Recommendation: Have a frequently updated project management method, such as Hack n Plan or Trello. Always check in with team mates to make sure that everyone has tasks and is happy with the current state of the project.

What Went Right?

1. A clear vision.

Since day 1, heck since 30 minutes after we were told the brief, we had a solid concept in our minds that we ended up sticking with. It was simple enough and had enough potential that we could all understand it straight away. We were all really keen and were willing to understand each others ideas for the project. Because our games pivoting and changes never interfered with this original concept, we were all able to keep up with the state of the game.

2. Skilled team.

Our team was filled with competent members and we really showed that in the first few weeks. We all had skills in different areas and were able to push the project to be the best it could be. There were a few hurdles later down the track but we were able to stick it out and produce a solid piece of media.

3. Motivation & Participation.

Since the first concept, we were all hooked on making this the best game we had ever made. Compared to previous projects, I had never felt so involved in an activity. We would all show up to meetings multiple times a week and we all had a perfect understanding of how the game functioned. When something was required from someone, they would get it done without issue, or ask for help otherwise.

Conclusion:

I learnt a lot in this project, both in the good and bad. It’s really given my confidence in my abilities and makes me want to work in a team a bit more than previously. My main issue with this project is that people that do not have much experience in teams, tend to work better solo. But at the same time if you learn to work in a team, then you can produce much better results, tenfold even. And so while one person was smashing out a quality game, we weren’t learning anything. I think that studio 1 is meant to be teaching us team work and to keep everything under control, and we just weren’t getting what we could have out of that period of time.

Pitching Scooch to Potential Collaborators

For the third project, we were given the opportunity to attract collaborators to work with us on our game. We pitched out project twice, once to our fellow class members and the second time to the potential collaborators. Because of this we were able to get some meaningful feedback before attempting to attract the external talent.

The methods that our team used to get the collaborators included putting the mechanics of the game at the end. Because the animators and audio students care about how their work will impact the game and the sort of work it will involve, we figured that leaving the game jargon until last will catch their interested more effectively.

With that said, another method we used was to reduce the amount of game jargon used in the pitch. Because of the first pitch we were able to refine our mechanics explanation down so that we didn’t confuse the audience in the second pitch. I think that I explained the game mechanics in a simple and concise way which got some of the collaborators interested.

After the pitch we had setup in the room next door and had quite a few animators come to checkup on the project with the interest of collaborating on Scooch. We ended up gathering five animators to collaborate on our project which we considered a success. The problem from there was figuring out what work we could get them to do.

What would I have changed?

I think that we were successful in gaining a lot of collaborators, the main problem being that they were all animation students. It was great that we were able to attract so many people but having 5 animators was not necessary, especially since our game consisted of mostly static objects. The main task for animators was to make 3D models, another issue with that being that one of our members is very skilled in 3D modelling. I had hoped that we would gather some audio students but unfortunately due to a mishap in the pitch we didn’t explain the audio of the game as clearly as we intended.

In the future I think its important to cater to all possible collaborators, it was definitely our intention to do so and we were able to pick up some audio students later down the line through networking. Explaining the importance of the assets needed for each field would be a good way to attract collaborators from other disciplines. We hadn’t explained how important it was for us to have audio in the game, and we had some really good ideas in mind for audio but didn’t end up implementing due to not enough audio collaborators.

Project 2 & 3 Pivot

In both project 2 and 3 there was a lot of feedback that ended up changing major parts of the games. Most of the time it wasn’t stuff that we had thought of at all, and sometimes they were risks we take for play testing to see what people think.

Project 2

In project 2 our second iteration of the game included a very complex system for maths and card dynamics. The cards explanation was confusing to the play testers because they could not figure out what card was being affected by the card effects, and they couldn’t figure out when card effects are applicable or not. The play testers main feedback was that the rules and card effects were too vague and left them to guess, and because of the complexity of the game, they aren’t sure what to assume. Because of this we opted to add a target system and a effect type system. The target system makes it so that on a card there will be the cards target displayed and then the cards effect underneath it. Eg.

Previously: Choose a Blame card and add 10 score.
After Update: Target: Blame card of choice. Effect: Add 10 Score

The effect type system helped players know when a cards effect should be applied or not. The two effect types were Trigger and Persistent, trigger meaning that the cards effect is applied when it is played and never again. Persistent means that the effect stays in effect while the card is on the field. These new systems were good for people who knew about card games and were interested enough in games to focus. But that became the new problem…

The game had so many things to remember and the cards were cluttered with jargon, the feedback we were getting from external play testers was telling us to simplify our changes that were meant to simplify the game. Our solution to this was a redesign in cards, thankfully the designers that were working on the cards had designed them to hold a lot of text. Originally I had tried to keep it minimal but I found out that, that was my downfall. Now that there is a paragraph on each card, the effects and targets can be explained in sentence rather than using jargon modifiers that the player doesn’t care to learn about.

Project 3

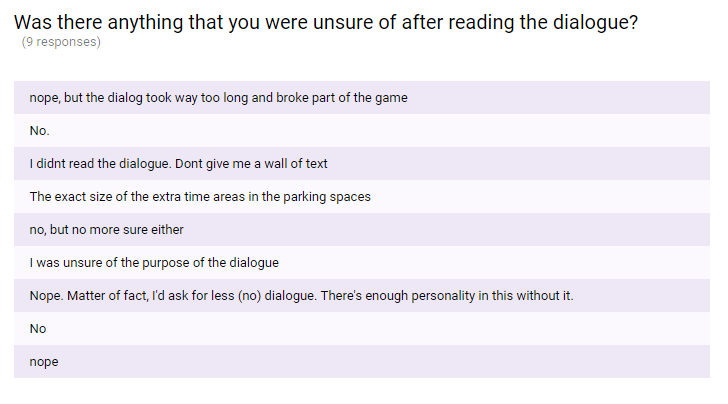
In the final weeks of Scooch play testing, some meaning feedback was flowing in that we took on board to change the game. We added the dialogue system to better teach the player how to play, but the issue that arises with that is that people don’t like reading. A lot of the feedback suggested that the dialogue system didn’t achieve what we wanted and was a waste of time.

ques1

Questionnaire question 1

As you can see with this screenshot, most of the testers seem unsure about the dialogue system and why it exists. So we made some changes to the game, we made the dialogue consist of only 1 line sentences that could be read very quick and also removed the timer that stopped the player from skipping it. We moved the controls out of the dialogue system and put them in the level so that the player learns the controls as they play.

ques2

Questionnaire question 2

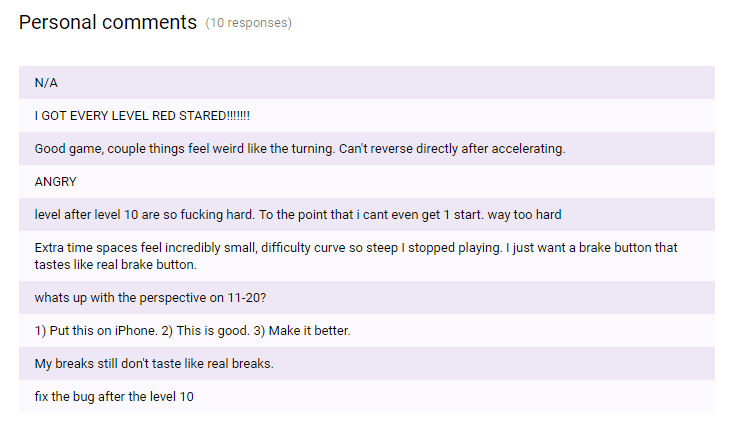
Another issue with the late additions to the project was that people were very unhappy with levels 11 – 20. Having half the levels being so disliked and causing people to almost rage quit, was a massive problem that I got to fixing straight away. We had our intended features in place and some time on our hands, so I remade levels 11 – 20 to feel more like levels 1 – 10 to keep the game consistent.

More RocketCraft Audio

Following on from my previous audio blog, I added some more features to the project in relation to audio. I mentioned that I wanted to add some collision sounds, pickup sounds and some more background music, so that’s what I’ve done.

For the collision sounds, I decided that I would make some myself using my mic and then adding effects in audacity. I recorded myself smacking my chair like a lunatic and then added some volume gain, bass and reverb to get a juicy sounding collision. I did this for 2 different hit effects, one being more of a punch and the other a slap. I went for the popping kind of hits rather than a crashing sound because the vehicle is a hovercraft so the underside is made of rubber like material and the body is lightweight material.

Because I had multiple hit sounds, when the sound is called in the script a random number is generated to decide which audio clip to play. The collision sounds are placed in an array and then when called I use the Random.Range function in the index of the array with a minimum value of 0 and a maximum of 1. I made the volume equal the players veolicty magnitude, this means that the faster the player is travelling the louder the impact. Even though the base functionality and concept is there, it needs some tweaking. To avoid the audio to be played a hundred times a second I made a cool down for the clip. In the player controller script I placed an if statement in Update as seen on the left, this subtracts from the timer while it is above zero. I placed an if statement in OnCollisionEnter that plays the audio clip only when the timer is less than or equal to zero, and then sets the time back to the cool down amount after being played.

I made a pickup sound in Bfxr which plays whenever the player collects the fuel pickup object. I also added some new background music for the main menu which is a more mellow tune, it’s less intrusive than the in level BGM. I decided to remove the engine sounds on the main menu because it isn’t the most pleasant thing to heard right after launching the game, the player hears enough of it while driving. Below is another audio demonstration in RocketCraft:

The new and improved hover craft for RocketCraft!

Today I made a new vehicle model for my project RocketCraft. The previous model was good at being a placeholder but it lacked the detail and shape that I wanted in the game. I decided to completely remake it because I wanted to take it from a different approach.

hovercraft0

Placeholder rocket craft

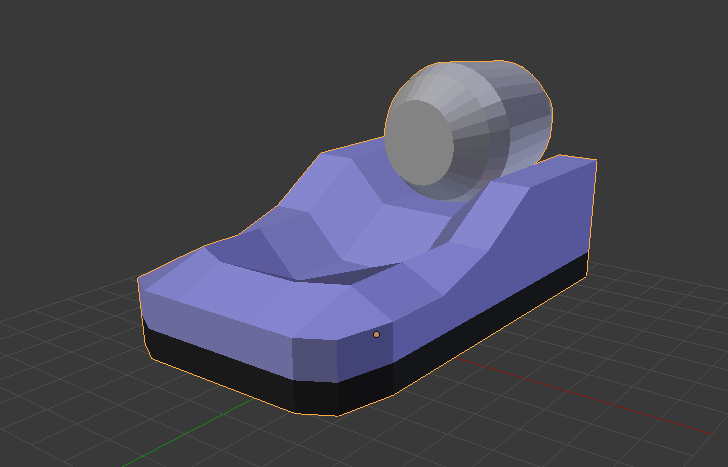
This is my placeholder model which I made this in a fairly short amount of time, I didn’t use any special technique, I simply grabbed the vertices and manually put in new transform locations. It was good for using as a placeholder so I could make my game work the way I intended it. But I believe I could do better, much better.

I started out with a new cube and subdivided it a single time and then deleted half of it to get the image on the left. Next I used the mirror modifier to get the image seen in the middle. The reason behind this is because I plan my model to be completely symetrical, and there’s no point in doing every change on each side when you can mirror the model and work on only one side. Definitely a helpful tip when it comes to symetry. Next I added a bevel modifier with the intensity at maximum and set the number of segments to 5 as seen on the right. I opted to apply this modification straight away so that the bevels wouldn’t change when I re scaled the object.

After that I scaled the object to be 6 units long (y axis) and 3 units wide (x axis), I kept the height (z axis) the same because it looked like a nice proportion. I selected all of the vertices except the ones in the center and applied something called a Smooth Vertex which rounds all the vertices as seen in the left image. Because of the mirror, having the center vertices selected decreases the size and leaves a gap in the middle. Another issue is that If I don’t select the middle vertices then the middle edge loop is left out of place as also seen in the left image. To fix this I added a new edge loop using the rip fill feature, the hotkey is Alt + V and it creates a new edge identical to the one selected, it’s like edge slide but it dupilcates it as well. I lined up the new edge loop close to the middle as seen in the middle image and then deleted the middle loop. To finalize the base shape I centered the new edge loop as seen in the very right image.

I moved onto forming the engine bay, I experimented with the amount of vertices I wanted to raise until I was happy with it. I then extruded from the top and changed its scale and position to get the image seen on the left. Next I selected the entire engine bay section except the top and applied another Smooth Vertex to get a more rounded look.

The next stage was creating the engine, I also lowered some vertices in the front area to accomodate a driver much like real hover crafts. I added a cylinder and deleted half of it so that it would mirror the way I wanted it just like the inital cube. I positioned it in the engine bay and scaled it to my liking. I sub divided it to get an edge loop in the middle so could again use the rip fill command to create another edge loop. I made these edge loops so that I could scale the ends to give the ends a taper as seen in the right image.

Something I really felt like adding was a strap to the engine, I really didnt know how I was going to achieve this so I used a sort of hacky method. I extruded from the base object and scaled it down to a small rectangle as seen in the left image. I then lowered the 2 inner vertices so the face would be sloped towards the direction I wanted the strap to extrude towards. I continued this to make a shotty looking curve as seen in the right image, and then connected them by changing the x axis transform of the vertices to 0. Finally I dissolved the extra edges on the cylinder, I used the initial sub divide to get the edge loop, but in the process it created extra edges along the length. Because I wasn’t able to make use of the extra polys I dissolved them so that there were no unecessary polys.

hovercraft14

The final result

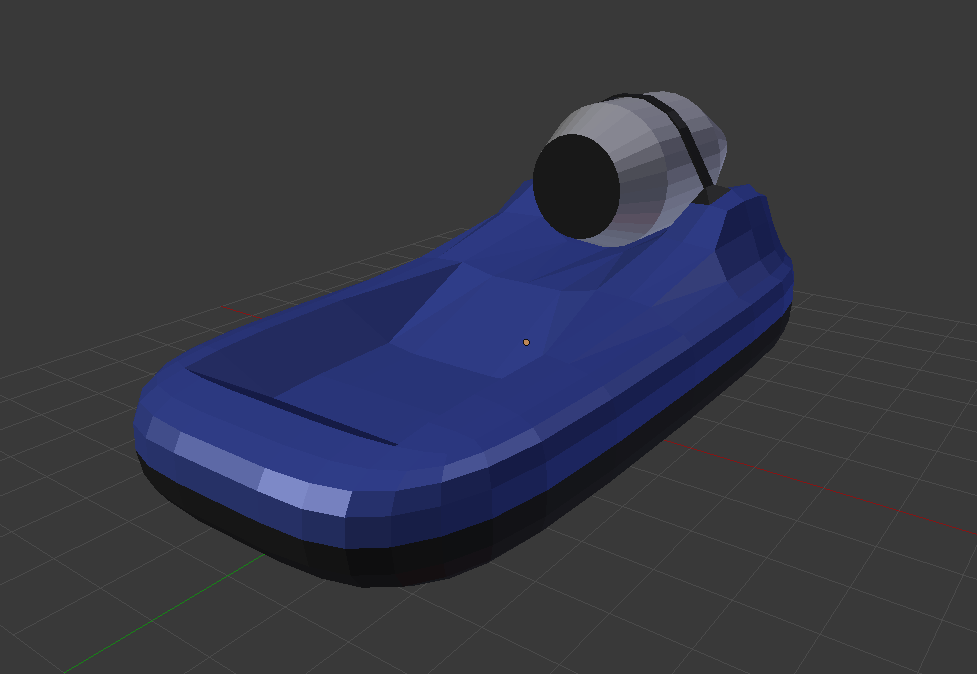
This is the result after applying some materials. I’m really happy with this process, I learnt some more about blender and made a nice object that I can further work on in the future. Next time I want to fix up the driver area because the sharp angles don’t match the rest of the vehicle. I wanted to make some roll bars that go over the driver area to get a more box like collision area and give it that extreme racing feel. Unfortunately I wans’t able to come up with a quick and dirty way to get this done so I’ll do that next time as well. Just like before I have a SketchFab link below so you can inspect it yourselves.

RocketCraft Particle Effects

RocketCraft has been a great opportunity for me to test out particles effects and learn Unity’s particle system. I’ve only scratched the surface of what I want to do with this project, but it has got me thinking about what else I can add. So far I’ve managed to get a quality looking rocket trail and some collision effects.

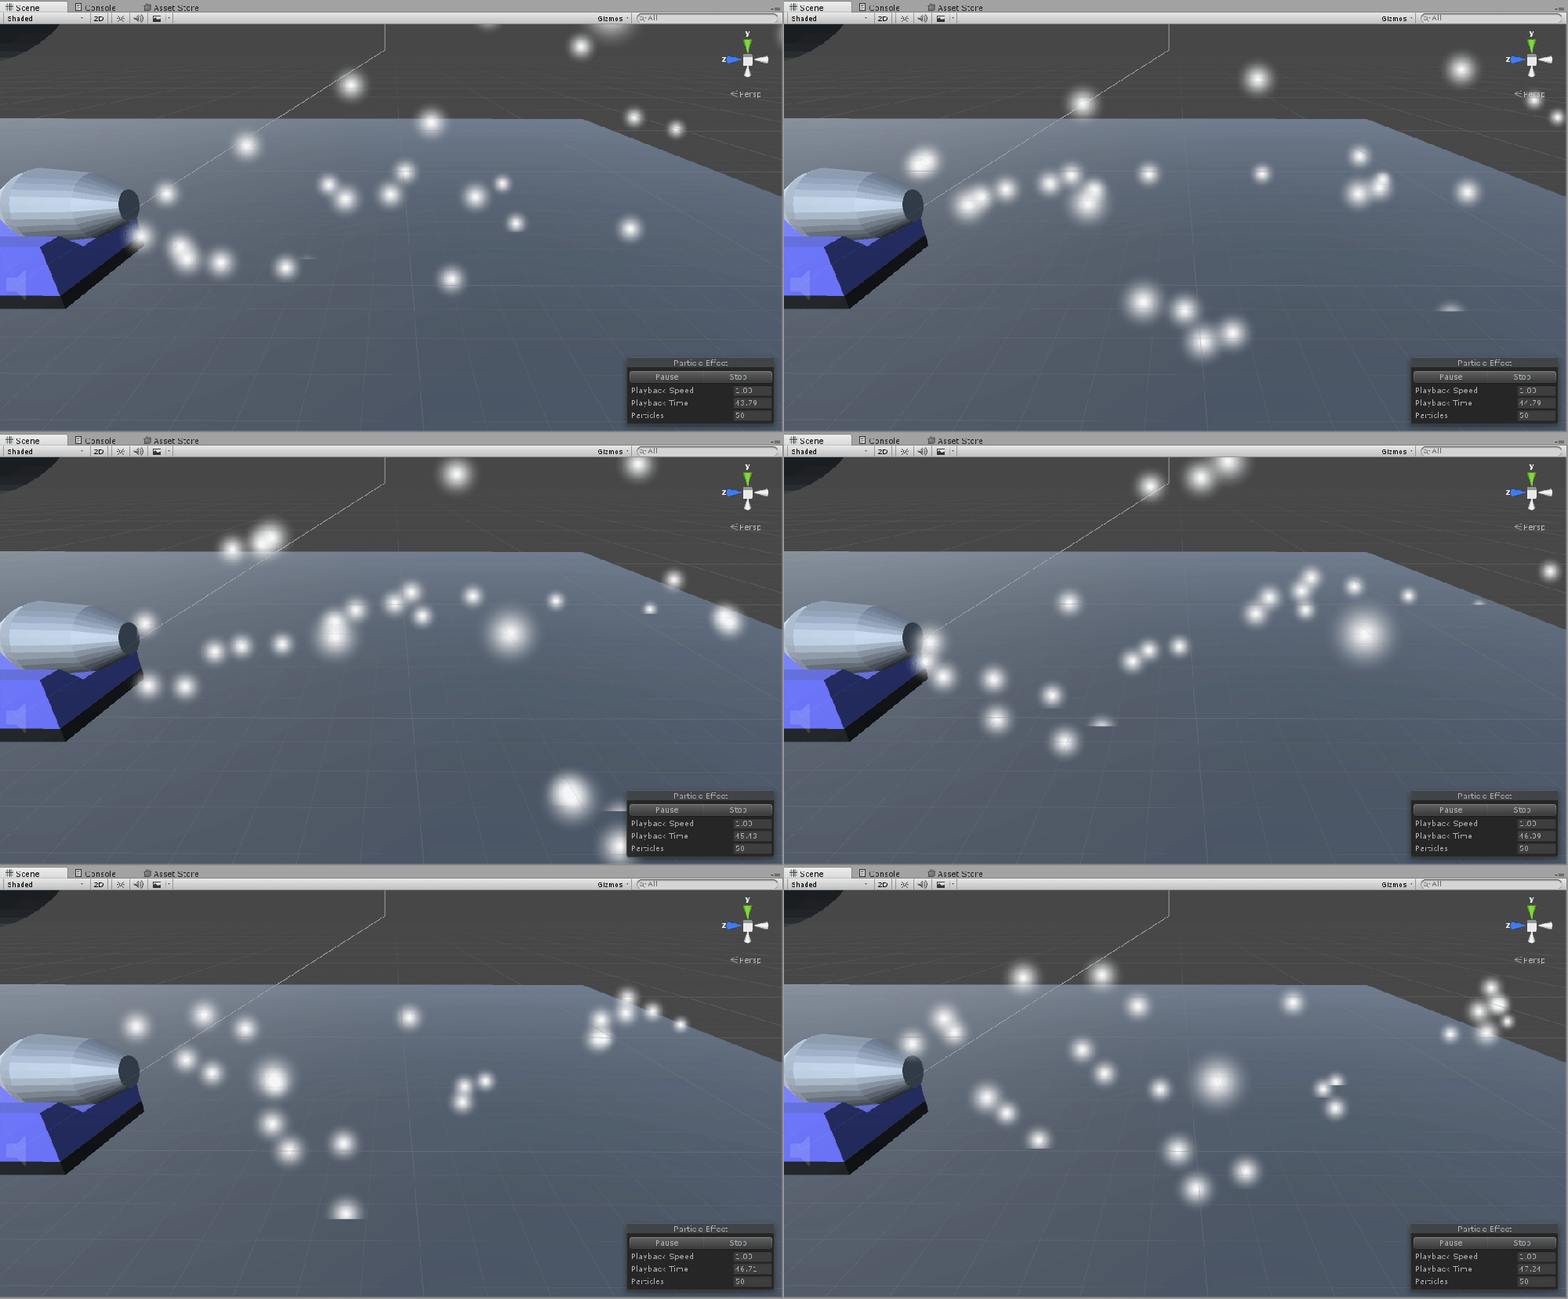
2016-12-11_17-46-59

Particle System with default values

For the rocket trail I made an empty object and made it a child of the rocket craft. The above gif shows the standard particle system without any modifications. To get the rocket flame I wanted I changed the shape to have a smaller radius and tighter angle. I increased the speed of the particles and the emission rate to get a more full effect. I modified the color over lifetime to match a flame; blue at the base and orange towards the end. To finalize the flame I wanted I added a curve to the size over lifetime so that the particles faded away over time. An extra note is that setting the simulation space and scaling mode between world and local can make all the difference. Having simulation space in world space will make the particles leave a realistic trail rather than having a static beam out the back.

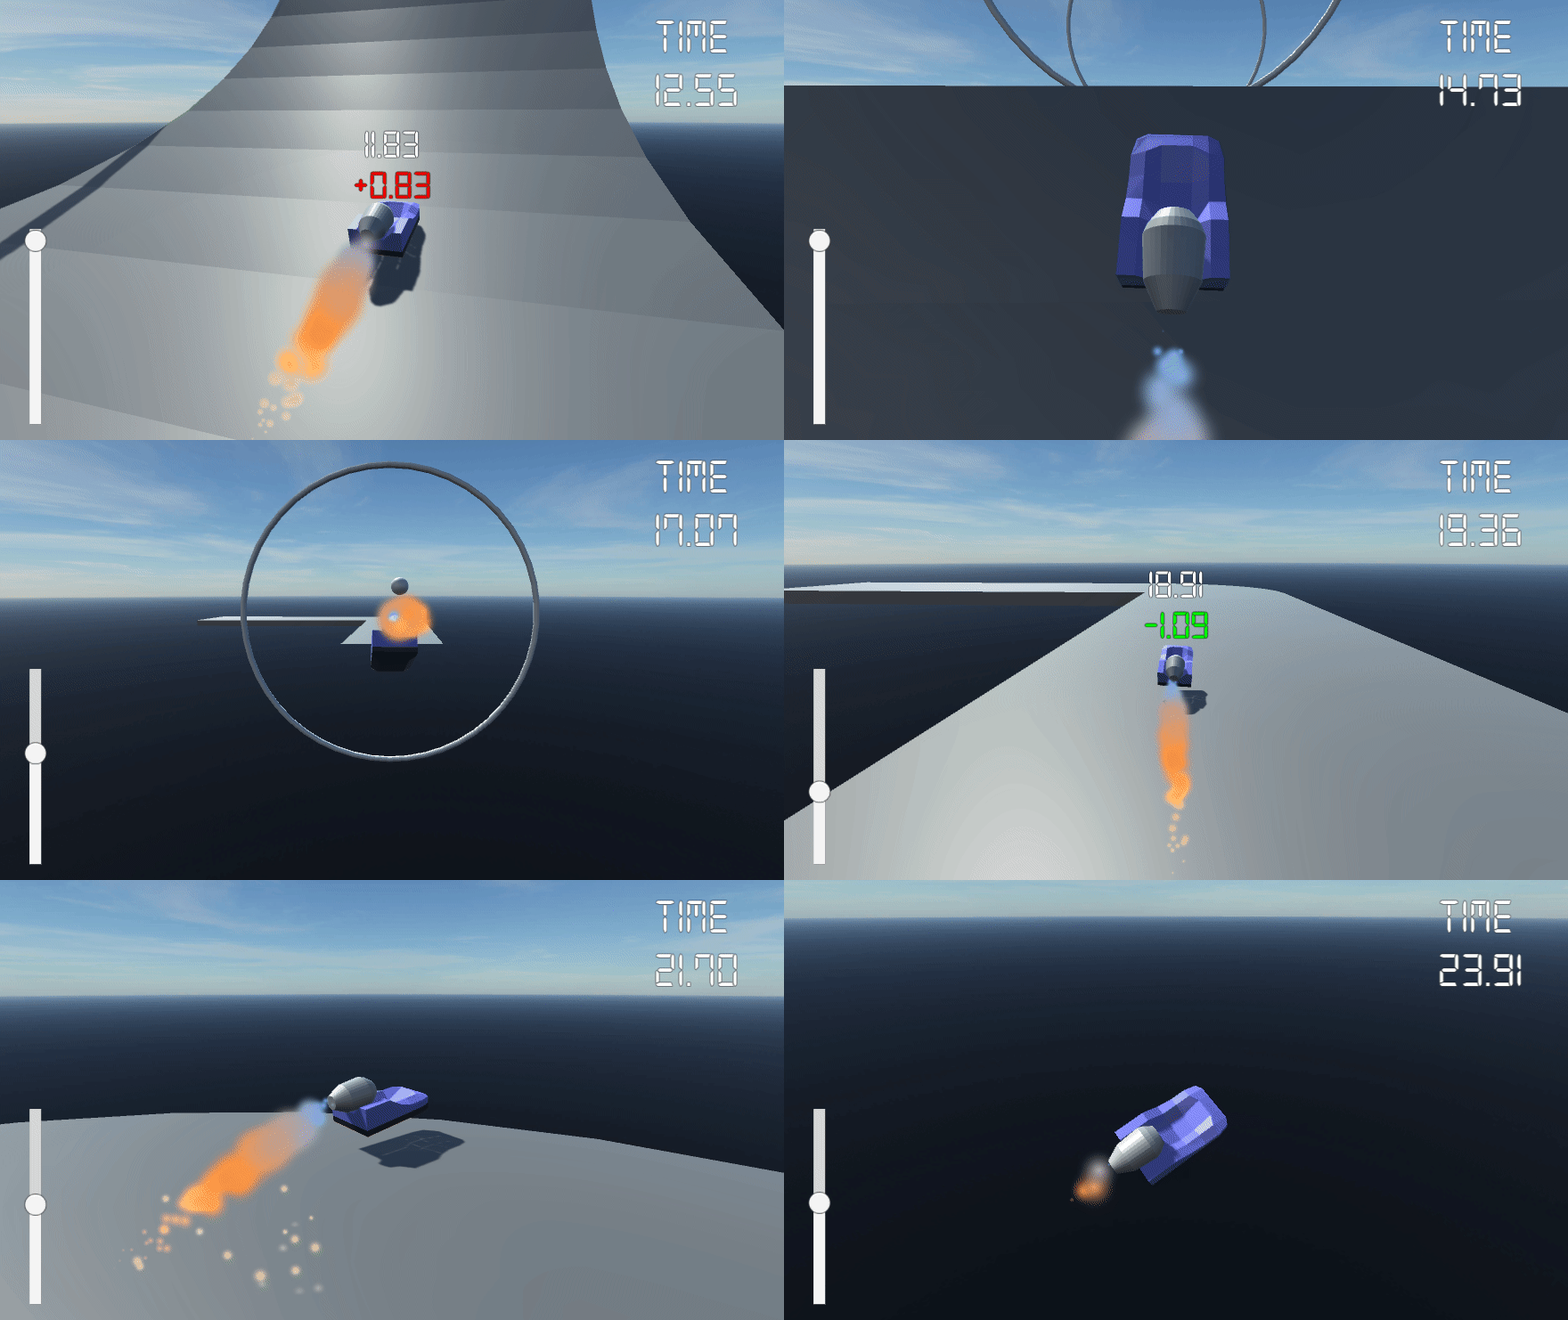
And voila, here is the current state of the rocket trail particle effect. As you can see the use of color over lifetime and the size over lifetime makes for a pretty convincing flame. The above image to the right shows the settings I used in the particle system inspector. To really finalize the effect I added a script that changes the emission rate and start lifetime. This makes it so the flame is much shorter and does not emit as many particles when the acceleration input is not pressed.

particle

Particle System script

What the script is doing here is very similar to the Audio Controller I made for the engine sounds. It modifies the particle systems emission rate and start lifetime with a linear interpolation. It lerps between itself and the players acceleration input multiplied by the max variable / co efficient. I’ve again used a min variable so the flame is still slightly active while idle, it is further complimented by the gas sound effect that stays on while idle.

Here’s the same video from my audio blog that showcases both lerp functions of the rocket engines audio and particle effect.

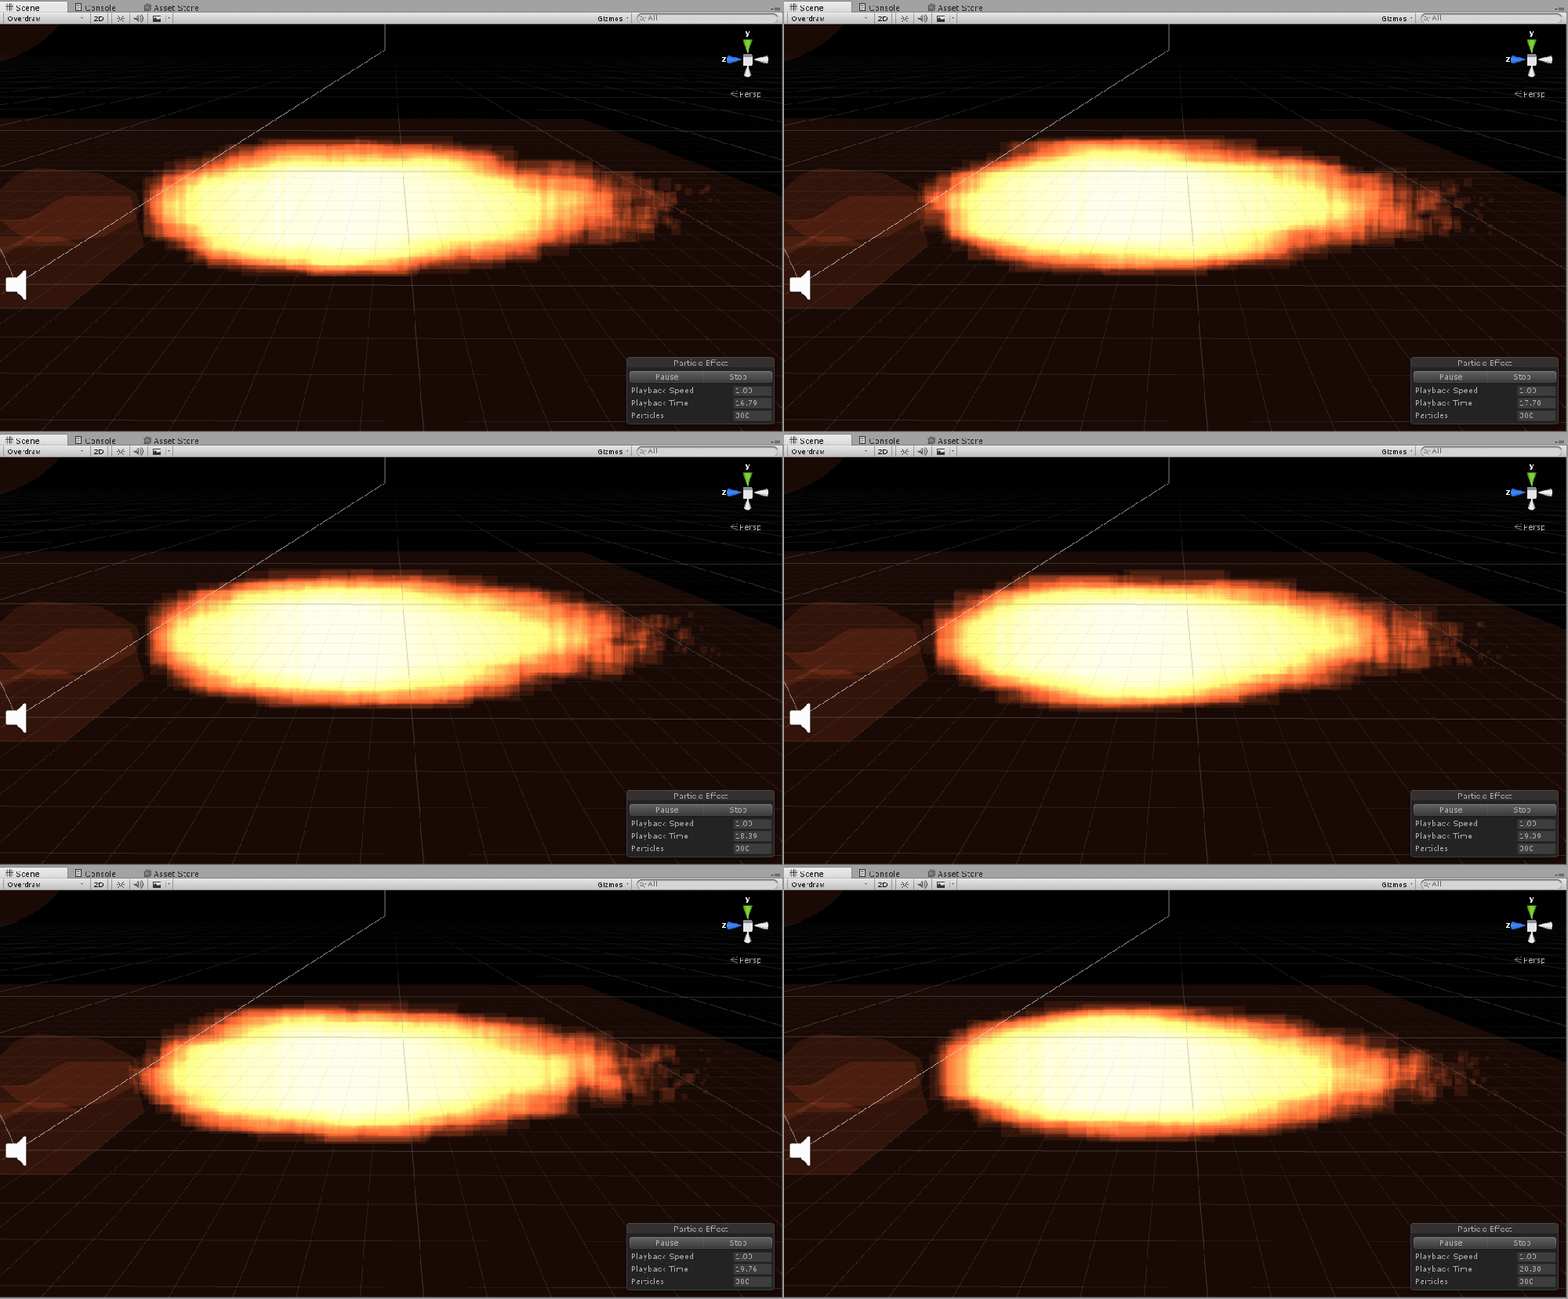
2016-12-11_17-47-42

An interesting find

After fiddling around with the shading options I found this interesting option that allows you to see how much overlap there is on a scene. In this above gif you can see that the image looks like a pixel fire, which I found really amusing. If I could, I’d love to make this an unlockable trail in the game if I can figure out how to make it. Such a minutiae find has got me thinking about all the possibilities I could do with unlockables which could include variations on rocket trails, different rocket crafts, different rocket engines etc. But anyways back to particles effects!

2016-12-11_20-03-23

Showcasing the collision effects in RocketCraft

So as well as the rocket trail I managed to get some collision effects working. I had absolutely no idea that collisions could detect the exact collision point and so I was hesitant to dive in to it. Little did I know the answer was a quick google search away. In the OnCollision function the collision parameter includes a Vector3.point which can be used to collect the point that the colliders touched. This is perfect for what I’m doing since I can just instantiate a prefab at the position as seen in the above gif.

spark

OnCollisionEnter function in the Player Controller script

As you can see in the above image, whenever the object that this script is attached to (which is the player vehicle) collides with another collider a foreach loop is started. The loop makes a new instance of a contact point for every contact in the other object. In this loop a new object is instantiated as a game object as the point of contact. Prior to this a float is created for the lifetime and a quaternion is created for the rotation. Another thing I learnt during this is that the time parameter in the destroy function still works even if the function was called only once.